

CUCKOO
User Manual
CBT-L2031W
CBT-L2031W User Manual
PARTS & ACCESSORIES
Main Frame

- 1 Control panel
- 2 Seat sensor
- 3 Bidet nozzle
- 4 Warm air outlet
- 5 Heated seat
- 6 Seat cover
Accessories
Mounting Hardware
- Fixing bolts (2)
- Fixing washer (2)
- Fixing brackets (2)
- Rubber nut (2)
- Main frame fixing plate (1)
Installation materials
- Filter
Plumbing Components
- Branched T-valve (1)
Accessories
- User manual (1)
Product Benefits
- Durable DesignBuilt for reliable long-term use.
- IPX5 Water-Resistant DesignDesigned to resist water exposure under normal use conditions.
- Easy Cleaning and MaintenanceThe seat can be easily removed for cleaning with a one-touch release.
- Child-Friendly FunctionIncludes a dedicated setting designed for safe and comfortable use by children.
- Extended Nozzle RangeProvideds a wider range of nozzle positions for improved coverage.
- Energy-Saving Mode (ECO)Helps reduce energy consumption during operation.
- Stainless Steel NozzleDesigned for improved hygiene and durability.
IMPORTANT SAFEGUARDS
READ ALL INSTRUCTIONS BEFORE USING
DANGER
To reduce the risk of electric shock :
- 1. Do not place or store this appliance in a location where it can fall or be pulled into a tub or sink.
- 2. Do not place in, or drop into water or other liquids.
- 3. Do not touch a product that has fallen into water. Unplug immediately.
WARNING
To reduce the risk of burns, electric shock, fire or injury.
- 1. Close supervision is necessary when this appliance is used by or is near infants, elders, or handicapped persons. Children should not be permitted to use or touch this appliance without adult supervision. Be sure to adjust the toilet seat's temperature for elders, handicapped persons, or people with sensitive skin.
- 2. Use this appliance only for its intended purpose as described in this manual. Do not use attachments not recommended by the manufacturer.
- 3. Do not operate this appliance if the cord is damaged or if the product is dropped into water.
- 4. Install the unit properly by following the installation procedure.
- 5. Only authorized persons can install or repair the unit. Do not attempt to service this appliance by yourself. Doing so could void the warranty.
- 6. Keep the cord away from heated surfaces.
- 7. Never drop or insert any objects into any opening or hose.
- 8. Do not use outdoors. Do not use aerosol or oxygen spray products on the unit.
- 9. Always follow the grounding instructions in this manual before plugging in the unit.
WARNING
SAVE THESE INSTRUCTIONS
CAUTIONS BEFORE INSTALLATION
NOTE THE FOLLOWING IMPORTANT POINTS
-
Do not install in a location where water might be splashed on this appliance or in a location exposed to excessive moisture where condensation might form on the product's surface.
-
To avoid damage to electronic components due to high levels or humidity, provide adequate ventilation by opening a window and/or door when bathing.
-
Water supply should have a water pressure of 0.11MPa to 0.68MPa.
-
Connect the product to a pipe carrying potable water. Do not connect to an industrial water line or other water supplies that are not potable.
-
Cool the unit in the room before installation.
-
The thermal protector in the water tank may malfunction when transporting or storing warm water.
-
The rated power voltage is 120V AC, 60Hz.
-
Do not plug the unit in until installation is complete. It may result in malfunction.
WIRING REQUIREMENTS
-
Any other servicing should be performed by authorized service representatives.
-
GROUNDING INSTRUCTIONS
- This product should be grounded. In the event of an electrical short circuit, grounding reduces the risk of electric shock by providing an escape wire for the electric current. This product is equipped with a cord having a grounding wire with a grounding plug. The plug must be plugged into an outlet that is properly installed and grounded.
-
DANGER
- Improper use of the grounding plug can result in a risk of electric shock.
- If the cord or plug is necessary to repair or needs to be replaced, do not connect the grounding wire to a flat blade terminal. The grounding wire can be identified by its insulated outer surface. It will either be colored green or will not contain yellow stripes.
- Check with a qualified electrician or serviceman if you do not understand grounding instructions or if you do not know whether the product is properly grounded.
-
This product is for use on a nominal 120V circuit. It has a grounding plug that looks like the plug illustrated in sketch A.
- A temporary adapter, which looks like the adapter illustrated in sketches B and C, may be used to connect this plug to a 2-pole receptacle as shown in sketch B if a properly grounded outlet is not available. The temporary adapter should be used only until the properly grounded outlet (sketch A) can be installed by a qualified electrician. The green colored rigid ear lug and the like extending from the adapter must be connected to a permanent ground such as a properly grounded outlet box cover.
- Whenever the adapter is used, it must be held in place by the screw.
-
If it is necessary to use an extension cord, use only a three wire extension cord that has a three-blade grounding plug, and a three-slot receptacle that will accept the plug on the product. Replace or repair a damaged cord.
CAUTIONS FOR SAFE USE
· Follow all safety instructions to ensure proper use and to prevent accidents.
· This section includes "Warning" and "Caution" notices, defined as follows:
| Symbol Type | Description |
|---|---|
| Warning | Indicates a potentially hazardous situation that could result in serious injury or death if not avoided. |
| Caution | Indicates a potentially hazardous situation that may result in minor injury or property damage if not avoided. |
| Triangle Exclamation Icon | Indicates a potentially hazardous situation requiring attention. |
| Prohibited | Indicates a prohibited action. |
| Instructions | Indicates a required action. |
WarningProhibited
Do not use or spray strong cleaning agents on the unit.
- Do not use or spray strong cleaning agents (such as acidic, alkaline, or stain-removing cleaners) on the unit. Do not spray air fresheners or similar products directly onto the unit.
- If you use any of the above-mentioned cleaning agents or air freshener, the exterior of the product may be discolored or damaged, causing a problem in safety of electricity.
WarningProhibited
When plugging in or unplugging the unit, ensure your hands are dry and hold the plug firmly.
- When plugging in or unplugging the unit, ensure your hands are dry and hold the plug firmly.
- If you do not do so, it may cause an electric shock.
WarningProhibited
Use a dedicated 120V outlet (15A or higher) that is properly grounded. Do not plug multiple devices into the same Power Outlet simultaneously.
- Use a dedicated 120V outlet (15A or higher) that is properly grounded. Do not plug multiple devices into the same Power Outlet simultaneously.
- If you use it with a lot of products, it may cause a fire or an electric shock.
- Please check the power outlet regularly.
- If it is not properly grounded, it may cause electric shock due to short circuit.
- If there is a foreign substance or moisture on the Power Plug, wipe it thoroughly before use.
WarningProhibited
Do not power the unit unless it is properly installed and connected to a water supply.
- Do not power the unit unless it is properly installed and connected to a water supply.
- It may cause a fire or malfunction.
WarningProhibited
Do not bend, pull, or twist the power cord excessively.
- Do not bend, pull, or twist the power cord excessively.
- It may cause an electric shock or fire.
WarningProhibited
This appliance is not intended for use by persons (including children) with reduced physical, sensory, or mental capabilities, or lack of experience and knowledge, unless they are supervised or instructed in the safe use of the appliance.
- This appliance is not intended for use by persons (including children) with reduced physical, sensory, or mental capabilities, or lack of experience and knowledge, unless they are supervised or instructed in the safe use of the appliance.
- Children should not play with the appliance.
- It may cause electric shock or injury.
WarningProhibited
Use only a potable water supply. Do not connect to non-potable or industrial water sources.
- Use only a potable water supply. Do not connect to non-potable or industrial water sources.
- Failure to follow these instructions may result in product malfunction or hygiene issues.
WarningProhibited
Risk of low-temperature burns.
- Risk of low-temperature burns.
- Prolonged contact with the seat or warm air may cause low-temperature burns.
- Adjust temperature settings when used by children, the elderly, or individuals with limited physical capabilities.
- After using the product at a high temperature, please lower the temperature for those users who are the elderly and the infirm, children, and those with weak skin.
- Prolonged use of the seat or warm air functions may cause low-temperature burns.
- Particularly pay attention to the temperature when children, those who cannot control the temperature on their own, or those with weak skin use the product.
WarningProhibited
Do not block the air outlet or insert objects into the unit.
- Do not block the air outlet or insert objects into the unit.
- It may cause burns or electric shock.
- It may cause a malfunction of the product.
WarningsProhibited
Do not disassemble, repair, or modify the unit. Prevent foreign objects from entering the unit.
- It may cause a malfunction of the product.
- It may cause a fire, electric shock, or bodily injury.
- Contact the Customer Service Center for repairs.
WarningsProhibited
Stop using the unit if the power cord or plug is damaged or loose, and contact the Customer Service Center.
- If the power cord is damaged, it may cause electric shock or fire. Inspect the cord and plug regularly.
- Contact the manufacturer or a qualified service technician for replacement.
- Damaged parts must be repaired at an authorized service center.
WarningsProhibited
Do not place cigarettes or other burning materials near or on the unit.
- It may cause a fire or malfunction of the product.
WarningsProhibited
Before removing the unit from the toilet, unplug the power cord from the outlet.
- It may cause an electric shock or fire.
WarningsProhibited
Do not spray water on the unit or the power plug, and do not use the unit in a humid environment.
- It may cause a fire due to a short circuit. It may cause a malfunction, and you may void the warranty.
WarningsProhibited
Do not place flammable materials (such as heaters or cigarettes) near the unit.
- It may cause a fire, discoloration, or malfunction.
WarningsProhibited
Do not modify, damage, or handle the power cord improperly.
- It may cause an electric shock or fire.
WarningsProhibited
Do not connect multiple devices to a single outlet at the same time.
- If you put power plugs of various products such as a ventilator in the bathroom or other electric products in a single power outlet, it may cause heat generation, ignition, or fire.
WarningsProhibited
When cleaning the bathroom or showering, unplug the unit and prevent water or detergent from contacting the unit or power plug.
- It may cause an electric shock or fire.
- If water or foreign substances enter the unit, unplug the power cord, close the water supply valve, and contact the Customer Service Center.
WarningsProhibited
Do not pull or bend the water supply hose excessively.
- It may cause a water leak or suspension of water supply.
CautionProhibited
If you notice unusual noise, odor, or smoke during use, unplug the unit immediately and contact the Customer Service Center.
- Continued use under these conditions may result in fire or electric shock.
CautionProhibited
Do not stand on or place objects on the toilet seat or seat cover. Do not sit on the seat cover.
- Do not use the seat, cover, or main unit as a step.
- It may cause damage or malfunction of the product.
- It may cause a bodily injury due to deformation or damage.
CautionProhibited
Do not use the product for purposes other than those described in this manual.
- It may cause a fire, electric shock, or bodily injury.
CautionProhibited
Do not allow children to insert objects or their hands into the nozzle or hot air outlet.
- It may cause burns.
- It may cause a fire or electric shock.
- It may cause a malfunction of the product.
CautionProhibited
Do not install the unit in direct sunlight.
- It may cause a discoloration on the exterior of the product or a malfunction of the product.
CautionProhibited
Do not immerse the unit in water.
- It may cause a malfunction, electric shock, or fire.
CautionProhibited
If dust accumulates on the power plug, wipe it off with a dry cloth.
CautionProhibited
Children may fall into the toilet. Always supervise children when using the product.
- If you do not do so, it may cause a bodily injury.
CautionProhibited
Do not force the toilet seat or seat cover closed.
- It may cause malfunction.
CautionProhibited
Do not lean heavily on the seat cover.
- It may cause malfunction.
- It may cause a bodily injury due to deformation or damage.
CautionProhibited
Do not operate the control panel unless you are seated on the toilet seat.
- Water may be discharged from the nozzle, which may cause splashing. This may result in burns or injury from hot water or air.
CautionProhibited
Before cleaning the product or when not using it for an extended period, unplug the power cord.
- If you do not do so, it may cause a fire.
CautionProhibited
After installation, check for any water leaks at the water supply connections.
- It may cause a fire or electric shock due to water leak.
CautionProhibited
In areas subject to freezing, keep the surrounding temperature above freezing.
- Freezing may damage the water supply hose and cause leaks. If freezing is expected, drain the water from the unit.
CautionProhibited
Before cleaning the water filter, close the water supply valve and disconnect the water supply hose After cleaning, reassemble the components securely to prevent gaps or leaks.
- It may cause a water leak.
CautionProhibited
Avoid contact of urine with the nozzle and hot air outlet.
- It may cause odor or malfunction of the product.
- If the nozzle becomes clogged, clean it with a soft sponge or an unused toothbrush. After cleaning, dry the area with a clean cloth or paper towel.
CautionProhibited
Do not connect the unit to a hot water supply.
- This may cause malfunction or injury. Always connect the unit to a cold water supply.
CautionProhibited
Do not use the unit if it is malfunctioning.
- In the following cases, unplug the unit and close the water supply valve.
- There is a water leak from the pipe or the unit.
- Unusual noise or odor is detected.
- The unit is cracked or damaged.
- Smoke is coming from the unit.
- Continued use under these conditions may result in fire, electric shock, or water leakage.
BEFORE INSTALLATION
Pre-Installation Checklist
Installation Location Precautions
-
Avoid installing the product in direct sunlight or near heating appliances.
- Exposure to direct sunlight or heat may cause fire, damage, or discoloration.
-
Check the dimensions of your toilet.
- The distance from the tank to the front of the bowl must be at least 490 mm.
- The distance between mounting holes must be 140–200 mm.
- This product may not be compatible with some toilet models.
-
Do not install the product in areas exposed to moisture, dust, or water splashes.
- This may cause malfunction.
-
Do not install the product in areas where temperatures may fall below freezing.
- The product is intended to be used indoors. Installing it in a place where the temperature goes down below 0 °C may lead to a malfunction of the product due to frozen filters or inside of the product.
-
Installation may not be possible with a flush valve. Verify the valve type before installation.
Moving Precautions
Use caution when moving the product.
- Do not place the product upside down.
- Always unplug the product before moving it.
Water Connection Precautions
Connect the water supply to a cold water line.
- Connecting the product to a hot water line may cause burns or malfunction.
HOW TO INSTALL
Installation Order
Warning
- Use only with a properly grounded 120V AC power outlet with a rating of at least 15A.
- Do not plug in the power cord before or during installation.
-
Disconnect the water supply hose
- Turn the water supply valve clockwise to shut off the water, then disconnect the toilet hose using a wrench.
-
Remove the existing toilet seat
- Unfasten the nut and remove the toilet seat.
- Set the old toilet lid and nuts aside for future re-installation.
-
Connect the T-valve
- Install the T-valve as shown in the image.
-
Install the bidet seat
- Place the main frame fixing plate on the toilet and affix the fixing bolts on the main frame fixing plate as shown in the image.
- The position of the mounting plate determines the final installation position of the product. Considering the size of the product and toilet, fix the Main Frame Fixing Plate in a suitable position. If the mounting plate is not positioned correctly, the seat may not align properly with the toilet.
-
Connect the flexible hose
- Connect the flexible hose to the T-valve and the main body. Turn the water supply valve counterclockwise to restore water flow.
Order of installation
Warning
- Use only with a properly grounded 120V AC power outlet with a rating of at least 15A.
- Do not plug in the power cord before or during installation.
-
Remove the original toilet seat.
- Unfasten the fixing nuts (2) on left and right sides and remove the seat and also separate the seat cover from the seat.
- Store the original toilet seat and hardware in a safe place for future reinstallation.
- Caution: Before installation, confirm that the bidet fits your toilet.
-
Turn the water supply valve clockwise to shut off the water, then disconnect the water supply hose from the toilet tank.
-
Install the T-valve where the water supply hose was disconnected.
-
Install the main frame of the bidet.
- As shown in the image, place the Main Frame Fixing Plate on the toilet and affix the fixing bolts on the Install the bidet mounting plate.
- As shown in the image, place the mounting plate on the toilet and tighten the mounting bolts securely.
- Secure the mounting plate firmly using a tool so that it does not move.
※ Align the center of the bidet with the center of the toilet before tightening.
-
Connect the bidet hose to the water supply inlet.
-
Connect the T-valve, water filter, and bidet water supply hose. Refer to the instructions below for water filter installation.
How to Install the Filter
-
Connect the filter between the T-Valve and bidet tubing.
- ※Please check the rubber sealing when connecting the T-Valve to filter.
- ※Do not use excessive force when connecting the T-Valve and tubing to the filter.
-
Please check for any leakages in the connection between the T-Valve, tubing, and the filter.
AFTER INSTALLATION
Sequence of Installation
-
Remove the packing sticker from the Bidet Nozzle.
- ※ You need to first remove the nozzle packing sticker from the center of the Main Frame of the Electronic Bidet to normally operate the product.
-
Open the Water Supply Valve by turning it to the left, and check if water leaks from the connection parts.
- Check if the T-Valve and the Main Frame Water Supply Hose are fastened in a straight line.
- ※ Warnings
- All parts throughout the manual need to be formatted the same--either Sentence Case or all lowercase
-
Plug in the power cord to an available power outlet.
- If the power supply lamp is not turned on after plugging in the power cord, press any button on the control panel found on the main frame.
- ※ Warnings
- When power is supplied to the main frame, do not turn or move the main frame as this may cause product malfunction.
-
With your left hand in contact with the Seating Sensor Unit (with the Seating Sensor Unit operating), press the Clean or the Bidet button to check if the Nozzle works and water is sprayed. Here, Cover the clean nozzle with your right hand to prevent water from splashing.
Pre-Use Checklist
-
Turn the power on.
- Plug the power cord into a 120 V AC outlet.
-
Replace the water filter regularly.
- If the filter becomes clogged, water flow may be reduced or stopped. Replace it as needed.
-
Sit fully on the toilet seat. Do not sit on the edge.
- If you shift your position or cross your legs, the seat sensor may not detect you and the product may stop.
- If a child seat is installed, the product may not operate properly.
-
Ensure adequate water pressure for proper operation.
- Water pressure may decrease during flushing.
- The product may not operate properly in areas with low water pressure. (Minimum required pressure: 0.04 MPa.)
Control Panel Functions
Warnings
- Always unplug the product before cleaning. Use a soft, slightly damp cloth. Do not use abrasive cleaners, solvents, or harsh chemicals, as they may damage the product.
Control panel
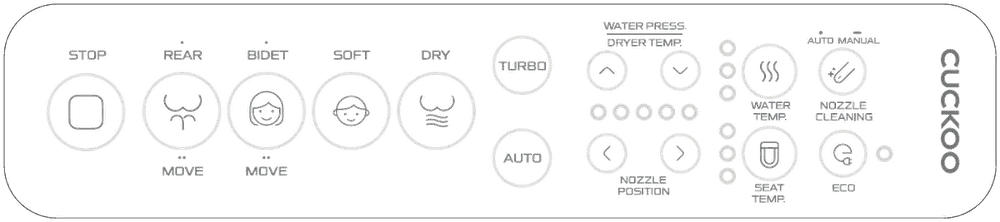
- STOP
- REAR
- BIDET
- SOFT
- DRY
- TURBO
- AUTO
- WATER PRESS.
- DRYER TEMP.
- NOZZLE POSITION
- AUTO MANUAL
- WATER TEMP.
- NOZZLE CLEANING
- SEAT TEMP.
- ECO
- MOVE
- MOVE
FUNCTIONS
| Icon/Button | Description | Icon/Button | Description |
|---|---|---|---|
| REAR / MOVE icon | Used when cleaning the anus | NOZZLE POSITION icon (left/right arrows) | Adjusts the nozzle's position from front to rear |
| BIDET / MOVE icon | Cleaning for women | WATER TEMP. icon (steam waves) | Adjusts the water temperature from Level 0 to Level 3 |
| TURBO button | Turbo water streams massage the anus to induce active and satisfying bowel movements. | SEAT TEMP. icon (thermometer/seat) | Adjusts the seat temperature from Level 0 to Level 3 |
| DRY icon | Initiates hot air drying • Automatically shuts off after 3 minute * Dries quicker if you wipe off the waterdrops with a tissue, etc. before drying. |
AUTO MANUAL / NOZZLE CLEANING icon | * Cleans the nozzle * To move the nozzle back and forth for automatic cleaning, press the button briefly * To move the nozzle all the way forward for 2 minutes, press and hold the button |
| SOFT icon | Emits soft water streams to automatically proceed from cleaning to drying • Automatically stops after 1 minute of cleaning and 3 minutes of drying |
ECO icon | Press the button once to turn ON/OFF the Power Save function. The ECO function can be used by pressing the button briefly. |
| AUTO button | Emits cleaning water streams to automatically proceed from cleaning to drying • Automatically stops after 1 minute of cleaning and 3 minutes of drying |
||
| WATER PRESS. / DRYER TEMP. (up/down arrows) | Adjusts the water pressure and hot air temperature from Level 1 to Level 5 |
- Always sit in the center of the toilet seat. Never perch or sit on the edge of the seat as the seating sensor will not be activated properly.
- If the water entry temperature is 15°C or lower, the temperature of the cleaning water may become lower than the set temperature (other operations work normally).
- If the water pressure is strong, the temperature of the cleaning water may become lower than the set temperature. In such cases, adjust the water pressure level to 3 or below for use.
If you stay seated on the seat or use the product in the hot air dry mode for a long time, you may get a low-temperature burn.
- When used by the following persons, please set the SEAT TEMP. button to "OFF" or "Level 2" for use. When used by children, senior citizens, those with vulnerable skin, those who are unable to control their own body temperatures, those who have taken sleep-inducing drugs (sleeping pills or cold medicine), those who are hungover or fatigued, it may cause a low-temperature burn or an accident.
HOW TO USE
Basic method of use
-
Sit on the seat.
- Sit in the center of the toilet seat to activate the sensor.
-
Press the button.
- initiate the cleaning function.
- If the button that was pressed during use is pressed one more time, MOVE CLEAN can be used.
-
Press the button. (DRY)
- Press the DRYER button to begin drying.
- The bidet will carry out the function for 3 minutes before automatically shutting off.
-
Press the STOP button.
- The initiated function will stop.
- The seating sensor of this product is installed inside the seat. It activates as soon as your skin comes in contact with the seat at the location of the seating sensor. If a cover, etc. is applied over the surface of the seat, the skin will not touch the seat, which may not activate the seating sensor.
HOW TO USE EACH FUNCTION
MOVE CLEAN
- If the button is pressed one more time while REAR, BIDET or TURBO is in use, the nozzle moves back and forth to perform MOVE CLEAN.
- If the button is pressed one more time during MOVE CLEAN, the nozzle stops.
WATER PRESSURE CONTROL
- You may change the strength of the water stream from Level 1 to 5 by pressing the WATER PRESS./ DRYER TEMP.
- If foreign substances become stuck on the waterworks filter, the water pressure may become weak. If the water pressure continues to weaken, the filter needs to be replaced.
- The default water pressure level is Level 3.
NOZZLE POSITION CONTROL
- You can change the nozzle position by pressing the NOZZLE POSITION button.
- The display lamp preferentially shows the water pressure level at all times.
- When the NOZZLE POSITION button is pressed, the position of the nozzle is displayed.
DRYER TEMPERATURE CONTROL
- You may change the drying temperature from Level 1 to 5 by pressing the LATER PRESS./ DRYER TEMP. button while the DRYER function is in use.
- The default drying temperature level is Level 3.
HOT WATER TEMPERATURE CONTROL
- You may change the hot water temperature from Level 0 (OFF) to the three levels (Low, Medium, High) by pressing the "WATER TEMP." button.
- The default hot water temperature level is set to OFF. After the hot temperature has been set once, the chosen level will then be automatically set as the default temperature.
SEAT TEMPERATURE CONTROL
- You may change the seat temperature from Level 0 (OFF) to the three levels (Low, Medium, High) by pressing the "SEAT TEMP." button.
- The default seat temperature level is set to OFF. After the seat temperature has been set once, the chosen level will then be automatically set as the default temperature.
SOFT
- This is a convenient function for children.
- It emits softer water streams than typical cleaning and is activated for 1 minute during which it executes automatic water pressure control and MOVE function.
- Once cleaning is complete, it automatically starts drying and stops it after 3 minutes.
ECO
- The ECO function can be used by pressing the "ECO" button briefly.
- The initial setting is in OFF and you can check whether or not the ECO function is activated through the display lamp.
- If you press the button briefly one more time, the ECO function is deactivated.
In the ECO mode, the hot water and seat temperatures are maintained lower than the set temperature so, when using the ECO mode in wintertime, the water and seat may be cold at first.
Other power-saving measures
To save power, the following are recommended.
| Measure | Description |
|---|---|
| Keep the seat cover closed. | If the seat cover is closed after use, less heat is generated from the surface of the seat to save power. |
| Set a low temperature. | It saves power if the temperature is set as low depending on the season and to the extent that you do not feel cold. |
| Keep the power cord unplugged. | When you go out or do not plan to use the product for a long period, unplugging the power plug saves power. |
SELF-CLEANING
- Before every use of cleaning, the nozzle comes out and cleaning water is emitted to clean the nozzle.
- After every use of cleaning, the nozzle goes in and cleaning water is emitted to clean the nozzle.
NOZZLE CLEANING
(1) Automatic function
- While you are not seated on the seat, press the ""NOZZLE CLEANING"" button briefly to use the automatic function.
- In the automatic function, the nozzle automatically moves for automatic cleaning of the nozzle.
(2) Manual function
- While you are not seated on the seat, press and hold the "NOZZLE CLEANING" button to use the manual function.
- When the manual function is activated, the nozzle comes out.
- Once the "STOP" button is pressed or 2 minutes pass by, the nozzle goes in for self-cleaning.
Pushing the nozzle in by force without pressing the STOP button may damage the nozzle.
HOW TO CLEAN
Cleaning Precautions
- Use of a sharp brush or a coarse dishwashing sponge for cleaning may cause scratches and/or damage to the product.
- Do not use sharp brushes or coarse dishwashing sponges to clean the bidet in order to prevent scratches or damage to the product.
- Refrain from spraying water on the nozzle and hot air inlet as this may cause electrical shock or product malfunction.
- Do not use a dishwashing sponge, benzene, thinner or other harmful detergents when cleaning the control panel. Always ensure the power plug is removed from the outlet before attempting to clean.
How to Clean the Nozzle
-
Automatic nozzle cleaning
- While you are not seated on the seat, press the "NOZZLE CLEANING" button briefly.
- The nozzle automatically moves back and forth for automatic cleaning.
-
The nozzle will automatically move back and forth for automatic cleaning
- While you are not seated on the seat, press and hold the "NOZZLE CLEANING" button for 3 seconds. The manual function will be activated to protrude the nozzle.
- Clean the nozzle with a soft sponge or an unused toothbrush.
- Once the STOP button is pressed or 2 minutes elapses, the nozzle goes in for self-cleaning.
Pushing the nozzle in by force without pressing the STOP button may damage the nozzle.
How to Clean & Replace Nozzle Cap
-
(Manual nozzle cleaning) If you press and hold the "NOZZLE CLEANING" button without sitting on the seat, the nozzle moves forward and stops for 2 minutes.
-
The nozzle cap will be separated from the nozzle if you press both of its ends and the nozzle downward in the vertical direction and then pull the cap slightly in the horizontal direction of the nozzle.
- Caution: If you pull the nozzle cap by force, the hook located on the rear of the nozzle cap may be damaged.
-
After separating the nozzle and nozzle cap, please clean the nozzle and nozzle cap with a soft sponge or an unused toothbrush.
-
After cleaning, insert the nozzle cap and press the STOP button to return the nozzle.
How to Clean the Exterior
- To prevent damage, do not use abrasive sponges or harsh cleaning agents.
- Do not use solvents such as benzene or thinner on the exterior.
- The exterior may be rinsed with water. Do not allow water to contact the power plug or electrical components.
- Always unplug the product before cleaning.
- Do not touch the power plug or outlet with wet hands.
- After cleaning, dry the product with a soft cloth.
Damage caused by improper cleaning, including discoloration, cracks, or scratches, is not covered under warranty.
Cleaning the Water Filter
- Clean the filter regularly.
- Turn off the water supply valve, then disconnect the water inlet hose or filter to clean the filter.
HOW TO DISASSEMBLE THE PRODUCT & STORE
How to Remove and Store the Product
※ If you need to remove the product for cleaning or relocation, follow the instructions below.
-
Unplug the power cord from the outlet.
-
Turn the water supply valve clockwise to shut off the water.
-
Loosen the nut connected to the T-valve and remove the bidet seat from the toilet.
- ※ To remove the bidet seat, press the lever and pull the product forward
-
Remove the bidet hose, T-valve, and mounting plate.
-
Reconnect the water supply hose to the water supply valve.
-
Turn the water supply valve counterclockwise and check for leaks around the hose connection.
-
Reinstall the original toilet seat using the saved nuts.
How to Use the Electronic Toilet Seat in Winter
-
Plug the power cord into an available 120V AC outlet.
-
Set the WATER TEMP. to "Low"
-
If storing the bidet during winter, do not store the bidet outside and be sure to keep in a warm, dry area.
TROUBLESHOOTING
If you're running into any issues while using your bidet, refer to the below troubleshooting chart to properly assess and correct the problem. If the problem perists, contact our Customer Service Center.
| Problem | Possible Issues | Corrective Action |
|---|---|---|
| Water is not being sprayed out when the bidet is plugged in and a function is initiated | • Is the water flow shut off? | • Wait until the water flow shut-off process ends. |
| • Is the water supply valve locked? | • Open the water supply valve. | |
| • Is the waterworks filter blocked? | • Replace the waterworks filter. | |
| The bidet is not operating properly/turning on | • Is the power plug plugged into a working outlet? | • Plug the power cord into an available 120V AC outlet. |
| • Was the bidet activated while you are not sitting down on the seat? | • Sit on the center of the toilet seat to activate the seating sensor. The bidet will not function if the sensor cannot detect you. Wait to operate the bidet until the blackout ceases. | |
| • Has there been a blackout? | • Please wait until the power is recovered. | |
| There is a water leakage | • Is the pipe connection properly made? | • Refer to "Before Installation" to ensure the water supply was connected to the bidet properly. • Contact the location of purchase or our Customer Service Center. |
| The water pressure is too weak | • Are foreign substances stuck on the waterworks filter? | • Clean the waterworks filter. |
| • Is the hose of the main frame bent? | • Smooth out the bent part of the hose. | |
| • Is the water pressure display lamp set to Level 1? | • Try raising the water pressure. | |
| • Is the waterworks filter blocked? | • Contact the location of purchase or our Customer Service Center. | |
| The water temperature, the seat temperature, or air temperature are not warm enough | • Is the hot water or seat temperature set to "Low" or "OFF"? | • Set the hot water or seat temperature to either "Medium" or "High". |
| • Is the hot air temperature set to "Level 2" or below? | • Set the hot air temperature to "Level 3" or higher. | |
| • Is the water entry temperature low (below 15°C) or the water pressure set to "Level 5"? | • To maintain the temperature of hot water, set the water pressure to "Level 3" or below. | |
| • Is the ECO mode turned on? | • In the ECO mode, the temperature is maintained lower than the set temperature. Either deactivate the ECO mode or sit on the seat and wait for about 5 minutes. | |
| The main frame shakes while in use | • Are the fixing bolts that fix the main frame loose? | Re-fasten the fixing bolts of the main frame. |
| The buttons do not operate when pressed | • Is there any water on the touch control panel? | • If any water gets onto the control panel, buttons may not work so be sure to remove any water first before use. |
SPECIFICATIONS
Product Specifications
| Model name | CBT-L2031W | ||
| Seat type | ELONGATED | ||
| Rating | 120V AC / 60Hz | ||
| Maximum power consumption | 660W | ||
| Power cord | About 1.5m | ||
| Water supply method | Direct connection water supply | ||
| Cleaning divece | Water volume | CLEAN | About 0.74L/min |
| BIDET | About 0.71L/min | ||
| TURBO | About 0.76L/min | ||
| Water pressure control | 5 levels | ||
| Temperature control | Room temperature, Low (93.2°F/34°C), Medium (98.6°F/37°C), Hight (104°F/40°C) | ||
| Heater capacity | 600W | ||
| Safety device | Temperature fuse, themo switch, water level sensor | ||
| Reverse-current prevention | Check Valve, Vaccum Valve | ||
| Seat heating device | Temperature control | Room temperature, Low (93.2°F/34°C), Medium (98.6°F/37°C), Hight (104°F/40°C) | |
| Heater capacity | 55W | ||
| Safety device | Temperature fuse | ||
| Hot air drying device | Temperature control | Room temperature - 131°F/55°C (5 levels) | |
| Heater capacity | 250W | ||
| Safety device | Temperature fuse | ||
| Water supply pressure used | 0.1~0.74MPa (1.0~7.5kgf/cm²) | ||
| Water supply temerature used | 41-93.2°F (recommendation : 59-77°F)/5-34°C (recommendation : 15-25°C) | ||
| Ambien temperature usage | 41-104°F (recommendation : 59-77°F)/5-34°C (recommendation : 15-25°C) | ||
| Product size | 16.9×21×6.4 Inch/ 430.5×534×162mm | ||
| Product weight | About 8.8 lbs / 4.0kg | ||
※ The product design and specifications may be changed without prior notice for improving product performance.
※ The proper water pressure for use is 0.11-0.68 Mpa (1.1 bar ~ 6.8 bar).
For customer support, please contact us with your product model, issue details, and contact information. We will assist you as promptly as possible.
- Keep this manual for future reference. This manual contains warranty information.
- Read this manual carefully to ensure safe operation and extend product life.