

CUCKOO
User Manual
CCM-BD011B
CCM-BD011B User Manual
Product Configuration and Components
Main Body
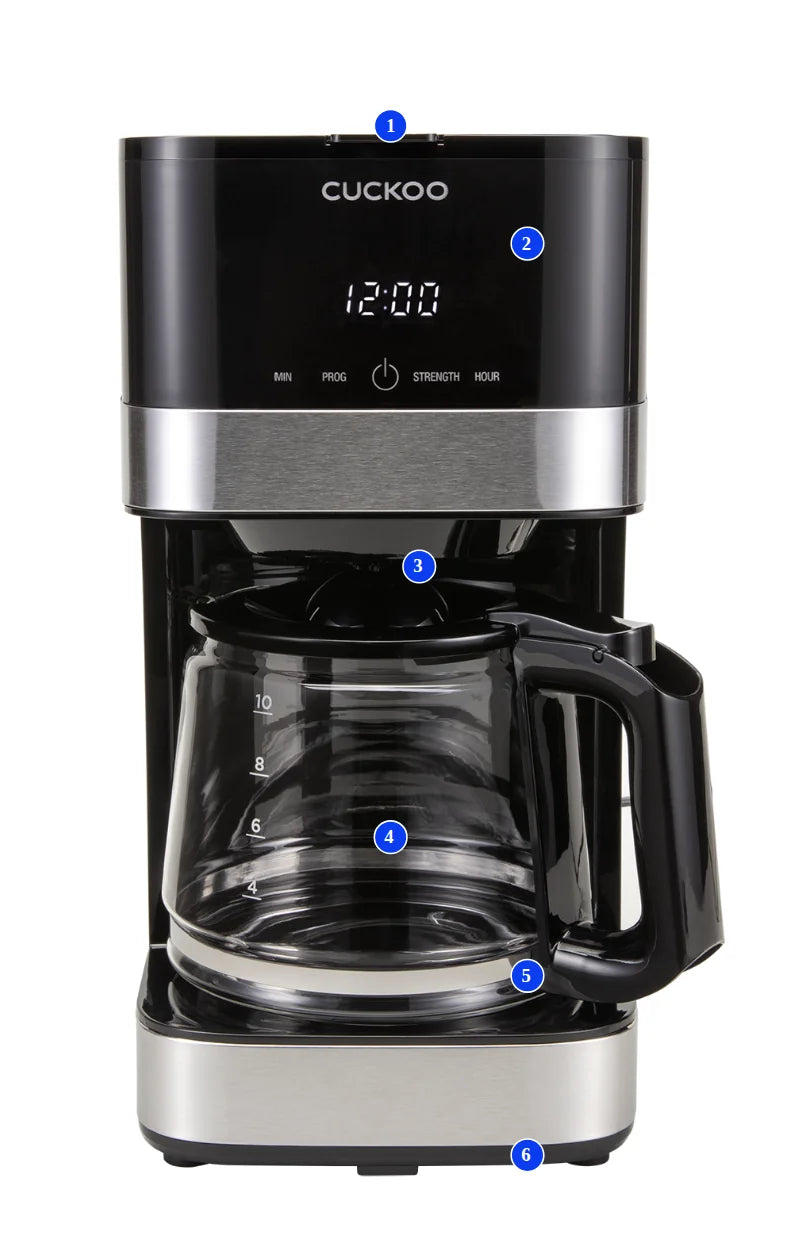
- 1Top Cover
- 2Control Panel
- 3Coffee Spout
- 4Glass Carafe
- 5Warming Plate
- 6Bottom Cover
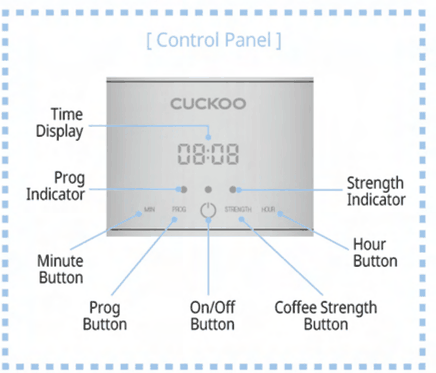
Control Panel
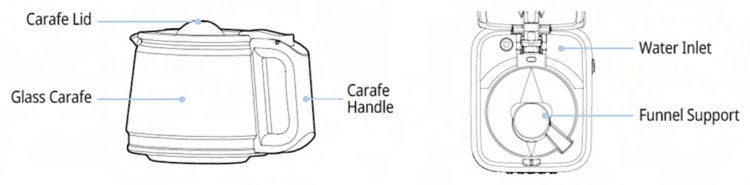
Carafe and Water Tank
Accessories

※ The product shown in this manual may differ from the actual product.
IMPORTANT SAFEGUARDS
- Observe Safety Warnings to prevent accidents and risks by using the product safely and correctly.
- Safety Warnings include warnings and cautions. The definitions of warning and caution are as follows.
| Symbol Type | Description |
|---|---|
| Warning | A potentially dangerous situation that may result in death or serious injury if not averted. |
| Caution | A potentially dangerous situation that may result in minor injury if not averted. |
| Triangle Alert Icon | This symbol is used to alert you to any situations that may be dangerous under certain circumstances. Carefully read the instructions and follow them when using the product to prevent danger. |
| Prohibited | This symbol indicates actions that are prohibited. |
| Instruction | This symbol indicates that a specific action should be performed. |
Warnings — Prohibitions
WarningsProhibitions
Dry your hands before plugging or unplugging the power plug. Plug or unplug by holding the power plug.
- Pulling out the power plug with wet hands may lead to an electric shock.
- Forcefully unplugging the power cord may cause abnormalities that lead to a short circuit or electric shock.
WarningsProhibitions
Plug the power cord into a surge protector and a 120 V outlet with a rated current of at least 10 A. Do not connect multiple devices to the same outlet or extension cord.
- Using this product together with a number of other products or devices may lead to overheating, fire, or electric shock.
- If there are any foreign substances or moisture on the power plug, wipe it before use.
WarningsProhibitions
Do not plug and unplug the power cord repeatedly.
- It may cause electric shock or fire.
WarningsProhibitions
Do not forcibly bend, tie, or pull the power cord.
- It may cause a short circuit, leading to an electric shock or fire. Be sure to frequently check the condition of the power cord.
WarningsProhibitions
Wipe any foreign objects off the power plug with a dry cloth.
- They may cause an electric shock or fire. Be sure to frequently check the condition of the power plug.
WarningsProhibitions
This appliance is not intended for use by individuals with physical, sensory, or mental disabilities, or who require supervision or guidance to use the appliance safely (including children).
- To prevent any accidents, instruct your children in advance not to play with the appliance.
- It may cause electric shock or injury.
WarningsProhibitions
Do not disassemble, repair, or modify the product.
Please contact our customer service center for repairs.
WarningsProhibitions
To prevent fire, electric shock, and injury, do not immerse the power cord, plug, or main body in water or any other liquid.
WarningsProhibitions
Do not touch the Carafe while the product is in use.
- Touching hot surfaces or spilling hot liquids may lead to injuries or burns.
WarningsProhibitions
Do not touch hot surfaces while the coffee is extracting.
- Touching hot surfaces may lead to injuries or burns.
- While the coffee is extracting, the Top Cover holds boiling liquid, which can cause injuries or burns.
WarningsProhibitions
Do not use the product near direct sunlight, gas or electric stoves, ovens, gas lighters, heaters, or inside a heated oven.
WarningsProhibitions
Use of parts not designed for this product may result in fire, electric shock, or injury.
WarningsProhibitions
Do not use the product outdoors.
WarningsProhibitions
To reduce the risk of fire and electric shock, do not remove the bottom cover.
This product does not contain any parts that can be repaired by the user. Repairs must be performed by certified technical experts only.
WarningsProhibitions
Do not use this product for purposes other than its intended use.
WarningsProhibitions
Do not use or leave curtains, dishcloths, flammable materials, or any heat-sensitive objects near the product.
WarningsProhibitions
Do not spray pesticides or chemicals into the product.
- Doing so may cause a fire.
WarningsProhibitions
Do not place the product on an uneven or tilted surface.
- Doing so may cause electric shock or injury.
WarningsProhibitions
Do not place the product on a rug, cushion, or coated surface.
- Doing so may cause electric shock or injury.
- The product may become deformed or malfunction.
WarningsProhibitions
Do not use or store pesticides, flammable gases or materials, or toxic materials near the product.
- Doing so may result in a fire or cause the product to become deformed or malfunction.
Warnings — Instructions
WarningsInstructions
If the power cord or plug is broken or loose, stop using the product and contact our customer service center.
WarningsInstructions
Do not leave the power cord hanging over the edge of a table or let it come in contact with a hot surface.
WarningsInstructions
To disconnect the appliance, press the Power button to stop the extraction cycle, then unplug the power cord.
WarningsInstructions
If the product is not in use or is about to be cleaned, end the extraction cycle or turn off Warming mode and unplug the power cord. Ensure the main body has cooled sufficiently before you attach or detach any parts or clean the product.
WarningsInstructions
Do not fill the Water Tank with any liquid or food that is not specified in the cleaning instructions of this manual.
WarningsInstructions
Keep the Top Cover closed at all times, except when filling the Water Tank.
WarningsInstructions
If the product malfunctions or is damaged in any way, have it checked or repaired at an authorized service center.
WarningsInstructions
Do not use the product if it operates intermittently or won’t operate at all.
Cautions — Prohibitions
CautionsProhibitions
Do not fill the Water Tank over its maximum capacity.
- The water may overflow. (Max. 10 Cup)
CautionsProhibitions
Do not make coffee when the Water Tank is empty.
- Doing so may cause product failure.
CautionsProhibitions
Do not drop or use excessive force on the product.
- Doing so may cause product defects or other safety issues.
CautionsProhibitions
Do not stand or place heavy objects on the product.
- Doing so may cause product failure or damage, leading to injuries.
CautionsProhibitions
Do not use the product with an empty Carafe on the Warming Plate.
- The Carafe may crack or become damaged.
CautionsProhibitions
Do not use the product if the Carafe has a crack or if the handle is loose or weakened.
- Doing so may lead to injuries or burns.
CautionsProhibitions
Do not touch the product until it has cooled down after use.
- Touching hot surfaces or liquids may lead to injuries or burns.
CautionsProhibitions
Do not move the appliance or open the Top Cover during use.
- Doing so may lead to injuries or burns.
CautionsProhibitions
The Carafe should only be used with this appliance.
Never use it with other appliances, such as microwaves.
CautionsProhibitions
Do not use parts that have not been tested for use with this product.
- They may cause injuries or product damage.
CautionsProhibitions
Handle the Carafe carefully as it is fragile.
CautionsProhibitions
Do not place a heated Carafe on a hot or cold surface.
- The Carafe may crack or become damaged.
CautionsProhibitions
Do not clean the Carafe with cleaning agents, steel wool pads, or any other abrasives.
- The Carafe may crack or become damaged.
Cautions — Instructions
CautionsInstructions
Make sure that the power is off before moving the product.
- Failure to do so may cause product defects or other safety issues.
CautionsInstructions
If the product emits any abnormal noise, smoke, or smell, unplug the power cord first, then contact our customer service center.
- Ignoring these issues may result in fire, burns, or injuries.
CautionsInstructions
Do not place the product or heavy objects on the power cord.
- Doing so may damage the power cord, leading to fire or electric shock.
CautionsInstructions
Do not tilt the product when filling the Water Tank.
- Doing so may cause accidents.
CautionsInstructions
Do not forcibly disassemble the product or use it for purposes other than its intended use.
- Doing so may lead to product defects.
CautionsInstructions
Do not use the product near hot gas, electric stoves, or heated ovens.
- Doing so may cause fire or electric shock.
CautionsInstructions
When placing the product on a countertop, make sure it is far away from faucets or heat sources.
- Failure to do so may cause product defects
CautionsInstructions
Do not use the product if the Water Tank is empty.
- Doing so may cause product defects.
CautionsInstructions
Do not clean the container with cleaning agents, steel wool pads, or any other abrasives.
- Doing so may damage the container.
ADDITIONAL IMPORTANT SAFEGUARDS
NOTES ON THE PLUG
This appliance has a polarized plug (one blade is wider than the other). To reduce the risk of electric shock, this plug will fit in a polarized outlet only one way. If the plug does not fit fully into the outlet, reverse the plug. If it still does not fit, contact a qualified electrician. Do not modify the plug in any way.
NOTES ON THE CORD
- a) A short power-supply cord (or detachable power-supply cord) is provided to reduce risks resulting from becoming entangled in or tripping over a longer cord.
- b) Longer detachable power-supply cords or extension cords are available and may be used if care is exercised in their use.
- c) If a long detachable power-supply cord or extension cord is used :
-
The electrical rating of the detachable power-supply cord or extension cord must be equal to or greater than the electrical rating of the appliance.
-
If the appliance is of the grounded type, the extension cord should be a grounding-type 3-wire cord; and
-
The longer cord should be arranged so that it will not drape over the countertop or tabletop where it can be pulled on by children or tripped over.
PLASTICIZER WARNING
CAUTION
To prevent plasticizers from migrating from the finish of the countertop, tabletop, or other furniture, place NON-PLASTIC coasters or placemats between the appliance and the finish of the countertop or tabletop. Failure to do so may cause the finish to darken, permanent blemishes to occur, or stains to appear.
ELECTRIC POWER
If the electrical circuit is overloaded with other appliances, your appliance may not operate properly. It should be operated on a separate electrical circuit from other appliances.
WARNING
TO REDUCE THE RISK OF FIRE OR ELECTRICAL SHOCK, DO NOT REMOVE THIS COVER. NO USER-SERVICEABLE PARTS INSIDE. REPAIRS SHOULD BE DONE BY AUTHORIZED SERVICE PERSONNEL ONLY.
Check Before Use
Before First Use
-
Open the Top Cover and fill the Water Tank until the water reaches the “Max. (10 Cup)” mark.
-
Caution
- When opening the Top Cover, hold the product in place as it may lift.
- Do not exceed the maximum capacity indicated on the Water Tank (10 cups).
- Do not fill the Water Tank with hot water.
-
-
Make sure the Coffee Funnel is properly fitted into the Funnel Support before inserting the Filter into the Funnel.
-
Caution
- The Top Cover won't close if the Coffee Funnel has been assembled incorrectly.
-
-
Close the Top Cover and insert the Carafe into the Warming Plate horizontally.
-
Caution
- Be careful not to drop the Carafe.
- Be careful when closing the Carafe Cover to avoid any impact to the glass.
- Make sure that the Carafe is attached properly when using the product. Operating this product without the Carafe may cause coffee to be dispensed onto the Warming Plate.
-
-
Plug the power cord into an outlet and press the On/Off button to begin extracting.
-
Caution
- Before the first use, run an extraction cycle with only water, without coffee grounds, to clean the interior.
- Do not touch the power plug with wet hands.
-
-
Run until the Water Tank is completely empty.
-
Caution
- Do not open the Top Cover during operation.
- Do not touch the product or the Carafe during use.
- Place the main body on flat surfaces.
-
-
Once the Water Tank is empty, turn off the extraction cycle and empty the Carafe.
-
Repeat this cleaning process 2 to 3 times.
-
Detach the Carafe, Coffee Funnel, and any other detachable parts, then wash them well with running water and dry them thoroughly.
How to Use
-
Open the Top Cover and fill the Water Tank with clean drinking water.
-
Caution
- When opening the Top Cover, hold the product in place as it may lift.
- Do not fill the Water Tank above the maximum capacity (10 Cup) mark.
- Do not fill the Water Tank with hot water.
-
-
Make sure the Coffee Funnel is properly fitted into the Funnel Support before inserting the Filter into the Funnel.
-
Caution
- The Top Cover won't close if the Coffee Funnel has been assembled incorrectly.
-
-
Fill the Filter with ground coffee.
- The recommended amount of ground coffee is one spoon per cup.
- Please adjust the amount of ground coffee according to your personal preferences.
-
Caution
- Be careful not to overfill the ground coffee.
- Do not add any substances other than coffee grounds to the Filter.
- Be careful as granules of ground coffee may stick to the product.
-
Close the Top Cover and insert the Carafe into the Warming Plate horizontally.
-
Caution
- Be careful not to drop the Carafe.
- Be careful when closing the Carafe Cover to avoid any impact to the glass.
- This product must be used with the Carafe. Operating this product without the Carafe may cause coffee to be dispensed onto the warming plate.
-
-
Plug the power cord into an outlet and press the On/Off button to begin the extraction cycle.
- When you press the On/Off button, the red On/Off indicator will begin flashing.
- The set time will be displayed on the Time Display.
- If you press the On/Off button again, the extraction cycle will stop and the On/Off indicator will stop flashing in red.
- Removing the Carafe during the extraction cycle will stop extraction.
- The cycle will end once the Water Tank runs out of water.
-
Caution
- Do not touch the power plug with wet hands.
- Failure to position the Carafe correctly may cause coffee to splatter.
- Be careful as removing the Carafe during the extraction cycle may cause coffee to be dispensed onto the Warming Plate.
-
If you want to pour out some coffee while it is still being dispensed, press the On/Off button to stop the extraction cycle, wait until the Coffee Spout stops dripping, and remove the Carafe.
-
Caution
- It takes about one minute after stopping or completing the extraction cycle for coffee droplets to stop falling.
- Less coffee may come out than water added in due to absorption from the coffee grounds.
-
-
Warming mode will automatically turn on after the extraction cycle is complete.
- Warming mode will automatically turn off after two hours, and the product will switch to Standby mode.
-
Caution
- Do not touch the main body while the product is in Warming mode as it may be hot.
-
If you press the On/Off button during extraction or while the product is in Warming mode, the cycle will stop and the product will enter Standby mode.
- Press the On/Off button again when the product is in Standby mode to resume the extraction cycle or switch back to Warming mode.
Product Functions
Power
- The product will enter Standby mode once powered on at 120 V.
- When connected to power for the first time, “12:00” will flash on the Time Display.
Functions
1) Operation
- If you press the On/Off button, the On/Off indicator will flash red and the product will enter the Extraction Mode.
- If you press the On/Off button while the product is in Extraction Mode or Warming mode, the On/Off indicator will turn off and the product will enter the Standby mode.
| Mode | Description |
|---|---|
| Extraction Mode | Activated when the power is on and the On/Off button is pressed. |
| Standby mode | Activated when the power is on but coffee extraction has not started, or when both Extraction Mode and Warming mode are off, or when Warming mode shuts off automatically after two hours. |
※ The time and program can only be set when the product is in Standby mode.
2) Extracting Strong Coffee
- If you press the Strength button, the Strength indicator will flash in red and the product will extract stronger coffee.
- Pressing the button again will disable Strength mode and the red light will turn off.
- Extraction takes longer in Strength mode in order to extract stronger coffee.
3) Time Settings
- You can change the time shown on the Time Display using the Hour/Minute button.
- Press the Hour button once to increase the hour setting on the Time Display by 1 hour.
- Press the Minute button once to increase the minute setting on the Time Display by 1 minute.
- If you press and hold the Hour/Minute button for two seconds or longer, the value will increase by approximately 4 to 5 units per second.
※ When the product is powered on, the Time Display will automatically be set to 12:00.
※ If you turn on the product again after leaving it unplugged for 25 seconds or longer, the time will be reset to 12:00.
4) Time Reservation Setting
- If you press the Prog button while the product is in Standby mode, the Prog indicator will begin to flash in white.
- Schedule the desired time using the Hour/Minute button.
- Once the time is set, press the Prog button to finalize the setting, and the Prog indicator will stop flashing.
- Extraction will begin automatically at the scheduled time, and the Prog indicator will turn off.
- If you press the Prog button again after setting the extraction schedule, the Prog indicator will turn off, disabling the scheduled time.
Warming Mode
- Warming mode turns on automatically after the extraction is complete.
- The On/Off indicator will remain red.
- The product will switch to Standby mode when the On/Off button is pressed or after it has been in Warming mode for two hours.
Interior Cleaning and Maintenance
CAUTION
- Do not clean the interior using any methods other than those advised in the User Manual.
- Wipe the base and exterior of the product with a soft cloth, avoiding contact with water.
- If the appliance has not been used for a long time, clean the interior before use.
- If an excessive amount of coffee oil has been extracted, clean the interior before the next use.
Removing Limescale with a Cleaning Product
-
Fill the Water Tank with a 4:1 mixture of water and a coffee machine cleaner (descaling agent) until it reaches the max mark.
- ※ You may use citric acid or white vinegar instead of a coffee machine cleaner (descaling agent). (100 parts water to 3 parts citric acid)
-
Caution
- Do not use substances other than water, coffee machine cleaners, and citric acids.
-
Make sure the Coffee Funnel is properly fitted into the Funnel Support.
-
Caution
- The Top Cover won't close if the Coffee Funnel has been assembled incorrectly.
-
-
Close the Top Cover and insert the Carafe into the Warming Plate horizontally.
-
Plug the power cord into an outlet and press the On/Off button to begin extraction.
-
Once the Carafe is about 1/10 full, press the On/Off button to stop extraction, and wait for 15 minutes.
-
Repeat steps 4 and 5 four to six times.
-
Extraction should continue until the Water Tank is completely empty.
-
Fill the Water Tank to the Max mark and press the On/Off button to begin extraction.
-
Repeat step 8 at least three times to rinse the inside of the machine thoroughly with clean water.
※ If any residue remains, fill the Water Tank with clean water and repeat the extraction process until it is completely clean.
※ After cleaning, wash the Carafe well and dry it thoroughly before use.
Exterior Cleaning and Maintenance
CAUTION
- Make sure that the product is unplugged before cleaning or maintenance.
- Sufficiently Dry the product before starting the cleaning process.
- Do not wash the product with hot water.
-
Detach the Carafe, Coffee Funnel, and Funnel Support from the product.
-
Wash the detached parts with a soft brush under running water, and then dry them thoroughly.
-
Caution
- Do not use cleaning liquids other than water.
- Make sure the parts are completely dry before use.
-
-
Wipe the product with a clean cloth or soft towel until it is completely dry.
-
Caution
- Do not wash the exterior of the product with water.
- After cleaning, dry the product sufficiently to remove any remaining moisture before use.
-
-
Gently wipe the Warming Plate with a wet cloth to remove stains and dry sufficiently before use.
Things to Check Before Reporting Malfunctions
▼ If the product is not used properly according to the User Manual, it may not function correctly, even if it is not broken.
If you experience any malfunctions, please check your product as described below. If the problem persists, please contact our customer service center.
| Problems | Check | Action |
|---|---|---|
| A button or indicator light won’t turn on or operate. | • Is the power cord damaged? • Is the power plug connected? • Does the outlet have the same voltage rating indicated on the product? |
• Check for power outages and use the product only when power is being supplied. If the power cord is damaged, contact our customer service center. • Check for power outages and firmly connect the power plug. • Make sure to only use the product with 120 V power sources. |
| The Top Cover does not close completely. | • Is the Filter the right size? • Is the Coffee Funnel fully inserted into the Funnel Support? |
• Please use the designated Filter. • Please fit the Coffee Funnel properly into the Funnel Support. |
| Coffee does not dispense consistently, or only water comes out. | • Is the Coffee Spout clogged? • Did you use any substances other than ground coffee? • Is there any foreign matter in the Filter or Coffee Funnel? |
• Remove any foreign matter from around the Coffee Spout and the inside of the product. • Please use ground coffee only. • Clean the Filter or Coffee Funnel thoroughly before use. |
| Nothing comes out of the Coffee Spout. | • Is the Water Tank full? • Is the Carafe positioned correctly? • Is the Top Cover open? |
• Make sure the Water Tank is filled with enough water. • Position the Carafe properly so that it is aligned with the Warming Plate and Coffee Spout. • Close the Top Cover securely before use. |
| In case of other problems | • Does the problem occur constantly? | • Please contact our customer service center. |
Product Specifications
| Product Name | Classic Drip Coffee Maker 10 Cup |
| Model Name | CCM-BD011B |
| Rating | 120 V / 60 Hz |
| Rated Power Consumption | 900 W |
| Additional Features | Strength mode, Scheduling feature, Warming function |
| Water Tank Capacity | Maximum : 10 Cups (1.5 L) |
| Product Weight | 2.06 kg |
| Product Dimensions | 169 mm (W) x 262 mm (D) x 337 mm (H) |
※ The printed specifications of the product may be subject to change.
※ Details indicated in this User Manual (exterior, design, and specifications) may change without notice for quality improvement.
CUCKOO
CUCKOO ELECTRONICS AMERICA, INC.
For service inquiries, contact us at support@cuckooamerica.com
www.cuckooamerica.com