

CUCKOO
User Manual
CCM-AK011B
CCM-AK011B User Manual
Product Configuration and Components
Part Names
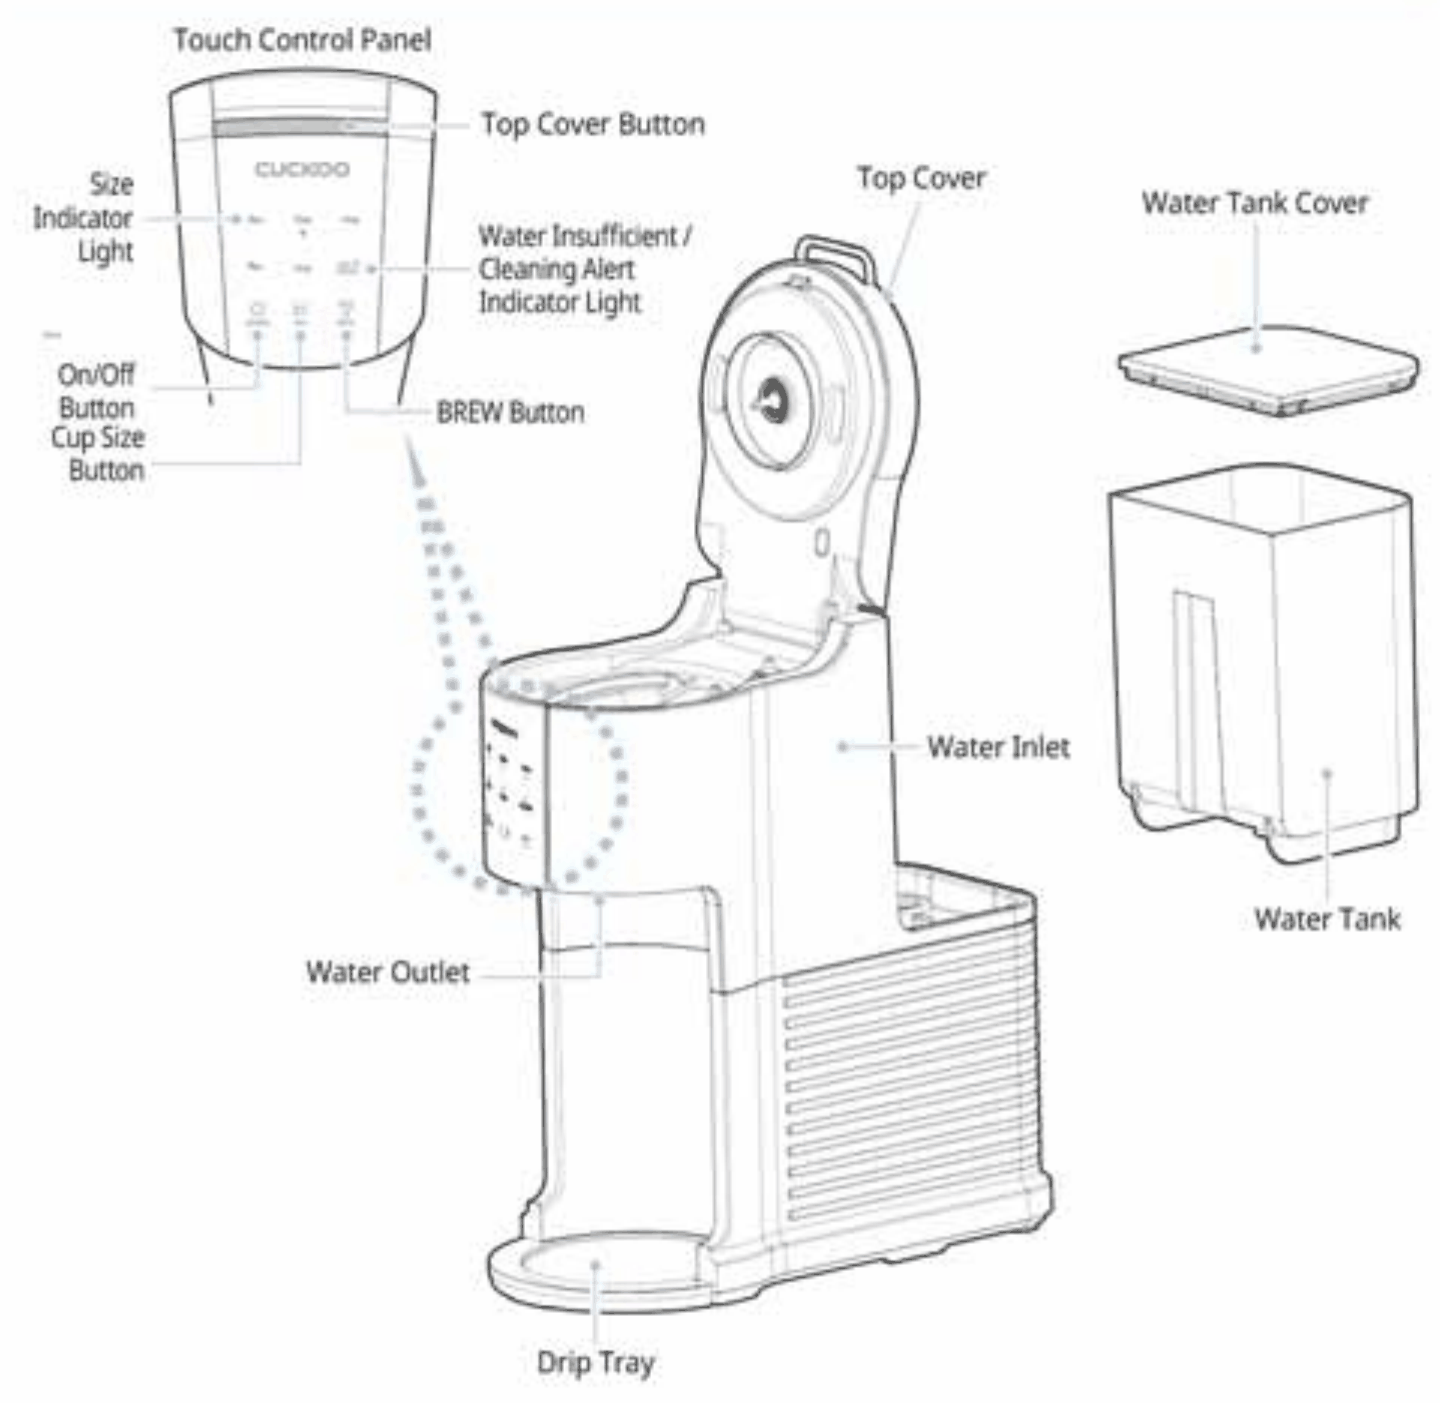
Accessories
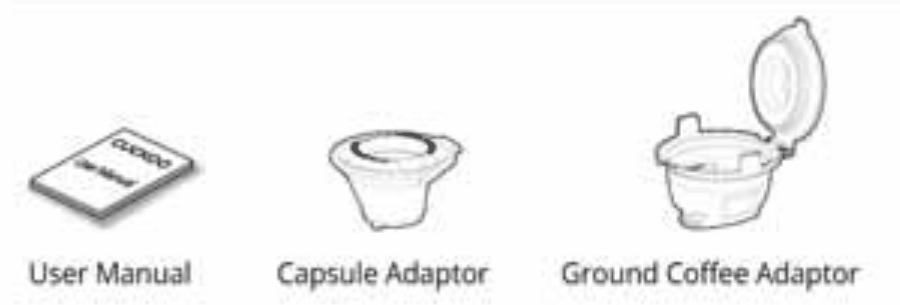
※ The product shown in this manual may differ from the actual product.
IMPORTANT SAFEGUARDS
- Observe Safety Warnings to prevent accidents and risks by using the product safely and correctly.
- Safety Warnings include warnings and cautions. The definitions of warning and caution are as follows.
| Symbol Type | Description |
|---|---|
| Warning | A potentially dangerous situation that may result in death or serious injury if not averted. |
| Caution | A potentially dangerous situation that may result in minor injury if not averted. |
| Triangle Alert Icon | This symbol is used to alert you to any situations that may be dangerous under certain circumstances. Carefully read the instructions and follow them when using the product to prevent danger. |
| Prohibited | This symbol indicates actions that are prohibited. |
| Instruction | This symbol indicates that a specific action should be performed. |
Warnings — Prohibitions
WarningsProhibitions
Dry your hands before plugging or unplugging the power plug. Plug or unplug by holding the power plug.
- Pulling out the power plug with wet hands may lead to an electric shock.
- Forcefully unplugging the power cord may cause abnormalities that lead to a short circuit or electric shock.
WarningsProhibitions
Plug the power cord into a surge protector and a 120 V outlet with a rated current of at least 10 A. Do not connect multiple devices to the same outlet or extension cord.
- Using this product together with a number of other products or devices may lead to overheating, fire, or electric shock.
- If there are any foreign substances or moisture on the power plug, wipe it before use.
WarningsProhibitions
Do not plug and unplug the power cord repeatedly.
- It may cause electric shock or fire.
WarningsProhibitions
Do not forcibly bend, tie, or pull the power cord.
- This may cause a short circuit, leading to electric shock or fire. Be sure to frequently check the condition of the power cord.
WarningsProhibitions
Wipe any foreign objects off the power plug with a dry cloth.
- Foreign objects may cause electric shock or fire. Be sure to frequently check the condition of the power plug.
WarningsProhibitions
This appliance is not intended for use by individuals with physical, sensory, or mental disabilities, or by those lacking the necessary experience and knowledge, who require supervision or guidance to use the appliance safely (including children).
- To prevent any accidents, instruct your children in advance not to play with the appliance.
- Improper use may cause electric shock or injury.
WarningsProhibitions
Do not disassemble, repair, or modify the product.
Please contact our customer service center for repairs.
WarningsProhibitions
To prevent fire, electric shock, and injury, do not immerse the power cord, plug, or main body in water or any other liquid.
WarningsProhibitions
Do not touch the surface when it’s hot.
- Use the handle provided.
- Failure to do so may result in injuries or burns from the hot surface or liquid.
WarningsProhibitions
Do not open the cover during extraction.
- To prevent hot liquid from splashing due to sharp needles, do not open the cover during extraction.
- The cover contains boiling liquid during extraction, which may cause injuries or burns.
WarningsProhibitions
Do not use the product near direct sunlight, a gas stove, microwave oven, gas lighter, heater, or inside a heated oven.
WarningsProhibitions
Use of parts not designed for this product may result in fire, electric shock, or injury.
WarningsProhibitions
Do not use the product outdoors.
WarningsProhibitions
To reduce the risk of fire and electric shock, do not remove the bottom cover.
This product does not contain user-repairable parts.
Repairs must be performed by certified technical experts only.
WarningsProhibitions
Do not use the product for purposes other than its intended purpose.
WarningsProhibitions
Do not use or leave curtains, dishcloths, flammable materials, or any heat-sensitive objects near the product.
WarningsProhibitions
Do not spray pesticides or chemicals into the product.
- Doing so may cause a fire.
WarningsProhibitions
Do not place the product on an uneven or tilted surface.
- This may cause electric shock or injury.
WarningsProhibitions
Do not place the product on a rug, cushion, or coated surface.
- It may cause an electric shock or injury.
- This may cause electric shock or injury, or result in product deformation or malfunction.
WarningsProhibitions
Do not use or store pesticides, combustible gases, flammable materials, or toxic substances near the product.
- This may result in fire, or cause product deformation or malfunction.
Warnings — Instructions
WarningsInstructions
If the power cord or plug is broken or shaky, stop using the product and contact our customer service center.
WarningsInstructions
Do not leave the power cord hanging over the edge of a table or let it come in contact with a hot surface.
WarningsInstructions
To disconnect the power from the appliance:
- Press and hold the on/off button until the power light turns off.
- Then, unplug the power cord.
WarningsInstructions
To unplug, grasp the plug and pull from the outlet. Never pull from the power cord.
WarningsInstructions
Turn off the power and unplug the power cord when the appliance is not in use or before cleaning:
- Ensure the main body sufficiently cools down before attaching or detaching any part or cleaning the appliance.
WarningsInstructions
This appliance should only be cleaned with water and cleaning vinegar.
- Do not fill the water tank with any liquid or food that is not specified in the cleaning instructions of this manual.
WarningsInstructions
Keep the water tank cover closed except when you are refilling the water tank.
WarningsInstructions
To reduce the risk of fire, do not store anything directly on top of the appliance surface when the appliance is in operation.
Cautions — Prohibitions
CautionsProhibitions
Do not add water over the maximum capacity of the container.
- The water may overflow. (Max 1.18 L)
CautionsProhibitions
Do not impact or drop the product.
- It may cause product defect or other safety issues.
- This may cause product defects or other safety issues.
- Avoid dropping or applying excessive impact to the product.
CautionsProhibitions
Do not stand on or place a heavy object on the product.
- The product may fall, leading to malfunction or damage that could cause injury.
CautionsProhibitions
Do not insert your finger into the capsule assembly part.
- It may result in injuries.
CautionsProhibitions
Be careful of the capsule-piercing needles when cleaning the product with the cover open or when inserting a capsule.
- The needles may cause injuries.
CautionsProhibitions
After using the appliance, keep your hand away from it until it sufficiently cools down.
- The hot surface or hot liquid coming out of the product may lead to injuries or burns.
CautionsProhibitions
Do not place the coffee maker in a cabinet when in use.
CautionsProhibitions
Do not move the appliance or open the cover during extraction.
- This may cause injuries or burns.
CautionsProhibitions
Do not forcibly insert a capsule that does not fit the product.
- This may cause product failure.
CautionsProhibitions
Do not use the product without the tray or a cup.
- This may cause injuries or burns.
Cautions — Instructions
CautionsInstructions
Make sure that the power is off before moving the product.
- This may cause product defects or other safety issues.
CautionsInstructions
If the product emits an abnormal noise, smoke, or smell, unplug the power cord first, then contact our customer service center.
- Failure to do so may result in fire, burns, or injuries.
CautionsInstructions
Do not place the product or a heavy object on the power cord.
- This may damage the power cord, leading to fire or electric shock.
CautionsInstructions
Do not tilt the product when pouring water.
- This may cause a safety accident.
CautionsInstructions
Do not forcibly disassemble the appliance or use it for purposes other than its intended purpose.
- This may cause product defects.
CautionsInstructions
Do not use the product near a heating appliance.
- This may cause fire or electric shock.
CautionsInstructions
If placing the appliance on a countertop, make sure it is far away from faucets or heat sources.
- Failure to do so may cause product defect.
CautionsInstructions
The coffee maker must be operated on a flat surface away from the edge of the counter to prevent accidental tipping.
CautionsInstructions
Avoid contacting moving parts.
ADDITIONAL IMPORTANT SAFEGUARDS
NOTES ON THE PLUG
This appliance has a polarized plug (one blade is wider than the other). To reduce the risk of electric shock, this plug will fit in a polarized outlet only one way. If the plug does not fit fully into the outlet, reverse the plug. If it still does not fit, contact a qualified electrician. Do not modify the plug in any way.
NOTES ON THE CORD
- a) A short power-supply cord (or detachable power-supply cord) is provided to reduce risks resulting from becoming entangled in or tripping over a longer cord.
- b) Longer detachable power-supply cords or extension cords are available and may be used if care is exercised in their use.
- c) If a long detachable power-supply cord or extension cord is used :
-
The marked electrical rating of the detachable power-supply cord or extension cord should be at least as great as the electrical rating of the appliance;
-
If the appliance is of the grounded type, the extension cord should be a grounding-type 3-wire cord; and
-
The longer cord should be arranged so that it will not drape over the countertop or tabletop where it can be pulled on by children or tripped over.
PLASTICIZER WARNING
CAUTION
To prevent plasticizers from migrating from the finish of the countertop, tabletop, or other furniture, place NON-PLASTIC coasters or placemats between the appliance and the finish of the countertop or tabletop. Failure to do so may cause the finish to darken, permanent blemishes to occur, or stains to appear.
ELECTRIC POWER
If the electrical circuit is overloaded with other appliances, your appliance may not operate properly. It should be operated on a separate electrical circuit from other appliances.
WARNING
TO REDUCE THE RISK OF FIRE OR ELECTRICAL SHOCK, DO NOT REMOVE THIS COVER. NO USER-SERVICEABLE PARTS INSIDE. REPAIRS SHOULD BE DONE BY AUTHORIZED SERVICE PERSONNEL ONLY.
Check Before Using the Product
Before First Use
-
Detach the water tank from the main body and remove the silicone part at the bottom.
-
Open the water tank cover, wash the inside with clean water, and attach it to the main body.
-
Caution
- Be careful not to lose the water tank cover.
-
-
Pour clean, potable water into the water tank up to the max line (40oz) and close the water tank cover.
-
Caution
- Carefully check the maximum capacity (Max) marked on the water tank.
- Do not fill the water tank with hot water.
-
-
Plug the power cord into an outlet and press the On/Off button to turn on the power.
- Once you press the On/Off button, all LED lights will blink once and enter Standby mode.
-
Caution
- Do not touch the power plug with wet hands.
-
Place a cup in the tray.
-
Caution
- Install the main body and tray on a flat surface.
- The tray does not have a part to hold it in place, so be careful not to drop it.
- The product must be used with a cup. Operating it without a cup may cause liquids to overflow.
-
-
Press the Size button to choose the cup size you want.
- 10 oz → 12 oz → 14 oz → 6 oz → 8 oz → 10 oz → ... (Repeats in cycles)
-
Press the Brew button to extract water.
- During brewing, the indicator light of the chosen cup size and the Brew button will turn on.
-
Repeat the above cleaning process 2 to 3 times before using the coffee maker.
How to Use
-
Open the water tank cover, pour clean, potable water into the water tank, and close the cover.
-
Caution
- Carefully check the maximum capacity (Max) marked on the water tank.
- Pour water at least to the minimum capacity (Min).
- Do not fill the water tank with hot water.
-
-
Plug the power cord into an outlet and press the On/Off button to turn on the power.
- Once you press the On/Off button, all LED lights will blink once and enter Standby mode.
-
Caution
- Do not touch the power plug with wet hands.
-
Place a cup in the tray.
-
Caution
- Install the main body and tray on a flat surface.
- The tray does not have a part to hold it in place, so be careful not to drop it.
- The product must be used with a cup. Operating it without a cup may cause liquids to overflow.
-
-
Press the Cover button upward to open the cover, then insert a capsule or ground coffee.
- How to Insert a Capsule
- 1) Insert the capsule adaptor into the inlet.
- 2) Insert a capsule that fits the adaptor into the capsule adaptor, then close the cover.
- How to Insert Ground Coffee
- 1) Insert the ground coffee adaptor into the inlet.
- 2) Place ground coffee or tea leaves, whichever you prefer, in the adaptor, then close the cover.
- ※ The recommended amount of ground coffee is 1 tablespoon per cup (5 oz).
-
Caution
- Take caution not to cut your hand on the capsule-piercing needles.
- Insert an adaptor that is suitable for the content.
- Do not fill the ground coffee adaptor over the Max line.
- When using ground coffee, be careful as the grounds may spill onto the product.
-
Press the Size button to select the cup size you want.
- 10 oz → 12 oz → 14 oz → 6 oz → 8 oz → 10 oz → ... (Repeats in cycles)
-
Press the Brew button to extract the drink.
- During brewing, the indicator light of the chosen cup size and the Brew button will turn on.
-
Caution
- While extracting a drink, the extracted content may splash on the inside or outside of the cup, the product, etc.
Product Functions
Functions
1) On/Off
- Once you press the On/Off button, all the LED lights will blink once and the product will enter Standby mode.
- Pressing the On/Off button in On mode will cause all the LED lights, except the On/Off LED, to turn off, and the product will enter Power-Saving mode.
| Mode | Description |
|---|---|
| Standby Mode | After turning the power on and before setting up extraction/After finishing extraction |
| Power-Saving Mode | When power is off/When the product is left idle for 5 minutes |
※ The Size and Brew buttons are disabled in Power-Saving mode. Press the On button to enable them.
2) SIZE
- Once you press the Size button, the size indicator lights will turn on in order. (10oz → 12oz → 14oz → 6oz → 8oz → 10oz → ... Repeats in cycles)
3) BREW
- Pressing the Brew button will start extraction at the selected size.
- While brewing, the indicator light of the selected size and the Brew button will be on.
- If you press the Brew button while brewing, extraction will pause.
※ Buttons other than Brew are disabled during brewing.
Extraction Amount
| Size | Capacity | Operating Time |
|---|---|---|
| 6 oz | 177 ml | 150 seconds or less |
| 8 oz | 237 ml | 175 seconds or less |
| 10 oz | 296 ml | 205 seconds or less |
| 12 oz | 355 ml | 220 seconds or less |
| 14 oz | 414 ml | 245 seconds or less |
※ Upon turning on, the product will automatically set the amount to 10 oz. Choose the desired extraction amount by pressing the Size button.
Water Insufficient Alert
-
If there is not enough water during extraction, this alert light will blink in blue, and the product will stop extraction and enter Standby mode.
-
Fill the water tank to resume the extraction.
Cleaning Alert
-
The cleaning alert light will blink white to indicate that cleaning is needed.
-
Clean the inside following the instructions on the Cleaning and Maintaining the Inside page.
※ Cancelling the cleaning alert : Press and hold the brew button for at least 5 seconds to turn off the cleaning alert and reset the accumulated number of operations to 1.
Cleaning and Maintaining the Inside
Clear Function
- If you press the On/Off and Size buttons at the same time for 3 seconds or more, the light of the Brew button will blink for 60 seconds and the hot water pump will operate.
- If you press the On/Off and Brew buttons at the same time for 3 seconds or more, the light of the On/Off button will blink for 60 seconds and the hot water/cold water pumps will operate together.
CAUTION
- Do not clean the inside using any other methods than those advised in the instruction manual.
- Wipe the base and outer pipe of the product with a soft cloth, and keep them away from water.
- If the cleaning alert appears, please clean the inside.
- If the product has not been used for a long time, please clean the inside before using.
Removing Limescale with Vinegar
-
Fill the water tank with a 3:1 mixture of water and vinegar until it reaches the Max line.
-
CAUTION
- Do not add any other liquids than water and vinegar.
-
-
Place an empty cup in the tray.
-
Start Clean mode.
- If you press the brew button for 5 seconds or more, start clean mode.
- During clean mode, the system will extract with a 14oz setting. Opening the top cover during clean mode will cancel the operation.
-
The Clean indicator light will light up in white.
-
Repeat the Clean process until the water tank is empty.
-
Clean the exterior with a dry cloth and completely dry the parts.
※ Recommended cleaning cycle is at least twice a year.
※ If there is any residue, fill the water tank and repeat the above cleaning process.
Cleaning and Maintaining the Outside
CAUTION
- Make sure that the product is unplugged before cleaning or maintaining the product.
- Sufficiently cool down the product before starting the cleaning process.
- Do not wash the product with hot water.
-
Detach the capsule adaptor, water tank, and tray from the product.
-
Wash the capsule adaptor and tray with a soft brush and running water and sufficiently dry.
-
Caution
- Do not use cleaning liquids other than water.
-
-
Wash the water tank using a soft brush and cleaning liquid, rinse thoroughly with running water, and sufficiently dry.
- When using a cleaning liquid, rinse the water tank thoroughly to prevent any residue.
-
Wipe the product with a clean cloth or soft towel, and sufficiently dry.
-
Caution
- Do not wash the main body with water.
- When cleaning the capsule-piercing needles, make sure no foreign objects enter them.
- After cleaning the product, sufficiently dry it to completely remove moisture before operation.
-
What to Check Before Asking for Support
▼ If the product is not used properly according to the instruction manual, this may result in the product not working correctly, even if it isn’t a malfunction.
If the product is not used correctly according to the instruction manual, it may not function properly, even if there is no actual malfunction.
| Problems | Check | Action |
|---|---|---|
| A button or indicator light won’t turn on or operate. | • Has the power cord been damaged ? • Is the power plug connected ? • Does the outlet have the rated voltage written on the product ? |
• Check for power outages and re-use the product when power is being supplied. If the power cord is damaged, contact our customer service center. • Check for power outages, and then firmly connect the power plug. • Make sure to use 120 V only. |
| The cover won’t fully close. | • Is the capsule the right size ? • Is the capsule fully inserted into the capsule adaptor ? • Does the coffee maker have any foreign objects on the inside or a capsule clogging it ? |
• Use only compatible capsules. • Make sure to insert the capsule fully into the capsule adaptor. • Remove foreign objects and try again. |
| Coffee is not extracted evenly, or only water is dispensed. | • Are the capsule-piercing needles clogged ? • Is the capsule adaptor or ground coffee adaptor clogged ? • Does the capsule have any abnormalities ? • Does the content exceed the Max line on the ground coffee adaptor ? |
• Remove any foreign objects from around or inside the capsule-piercing needles. • Remove any foreign objects from around the adaptor. • Check the capsule’s condition and use a new capsule. • Make sure the content does not exceed the Max line on the ground coffee adaptor. |
| The outlet won’t dispense the drink. | • Is the water tank sufficiently filled ? • Is the water tank in the right position ? • Is the cover open ? |
• Sufficiently fill the water tank. • Move the water tank to the right position. • Fully close the cover before use. |
| In case of other problems | • Does the problem occur constantly ? | • Please contact our customer service center. |
Product Specifications
| Product Name | K-CUP COFFEE MAKER |
| Model Name | CCM-AK011B |
| Rating | 120 V / 60 Hz |
| Rated Power Consumption | 1,000 W |
| Cup Size Adjustment Function | 6 / 8 / 10 / 12 / 14 oz |
| Alert Function | Water Insufficient Alert / Cleaning Alert |
| Water Tank Capacity | 40 oz / Minimum : 15 oz |
| Product Weight | 1.8 kg |
| Product Dimensions | 5.51 inches (W) x 11.14 inches (D) x 12.09 inches (H) |
※ The printed specifications of the product may be subject to change.
※ Details indicated in this User Manual (exterior, design, and specifications) may change without notice for quality improvement.
CUCKOO
CUCKOO ELECTRONICS AMERICA, INC.
For service inquiries, contact us at support@cuckooamerica.com
www.cuckooamerica.com
Document Number
Z0383-0285A0 Rev.0