

CUCKOO
User Manual
CF-AC1410WH
CF-AC1410WH User Manual
Parts & Accessories
Parts

- 1 Front Blade Cover
- 2 Motor Cover
- 3 Extension Support Mount
- 4 Base
- 5 Control Panel
Accessories
-
Manual
-
Remote Control
-
Power Cord
Important Safeguards
• Please comply with the following 'Safety Warning' to ensure safety and proper use of the product to avoid accidents or hazards.
| Symbol Type | Description |
|---|---|
| Warning | Potential hazardous situations that may result in death or serious injury if not avoided. |
| Caution | Potential hazardous situations that may result in minor injury if not avoided. |
| Triangle Exclamation Icon | This symbol is intended to alert the user about certain conditions that may cause a hazard. Please read carefully the instructions to avoid danger. |
| Prohibited | This symbol is a sign that 'prohibits' a certain activity. |
| Instructions | This symbol is a sign that 'instructs' a certain activity. |
WARNINGPROHIBIT
If the power plug or the power cord has been damaged or is shaking, stop using the product and contact the customer service center.
- If the sheath of the power cord has been stripped or damaged due to negligent use of product, it may lead to fire and electrocution. Please conduct frequent checks of the status of power cord, power plug, and power outlet.
- If the power plug or the power cord is damaged, replace the damaged part through the manufacturer, seller, or a qualified technician to prevent potential risk.
- You must repair the product through designated service centers.
WARNINGPROHIBIT
When you are plugging in or pulling out the power plug, dry off your hands and pull or plug in by grabbing on to the main body of the adapter.
- Pulling with excessive force may result in power cord issues which may lead to short circuit and electrocution.
- If the power plug or the power cord is damaged, replace the damaged part through the manufacturer, seller, or a qualified technician to prevent potential risk.
WARNINGPROHIBIT
Stop operating the product in a closed space or during sleep.
- Using the product for a prolonged period of time may result in hypothermia or sickness from overexposure to air conditioning.
WARNINGPROHIBIT
Do not place your hand or other foreign substance inside the safety net while the product is operating.
- The rotation may injure your fingers and the blades may be damaged, which may lead to other potential risks.
- Exercise special caution for children to prevent them from placing their fingers inside the safety net.
WARNINGPROHIBIT
Do not use the product in the state where the blades, safety net, or other parts of the product have been damaged.
- This may result in equipment failure or safety accidents.
WARNINGPROHIBIT
If the product has been disassembled, do not connect power until the blades and safety net have been assembled completely.
- Safety accidents may occur if the product is not fully assembled.
- This may result in fire, electrocution, or injury (wound).
Safety Precautions
WARNINGPROHIBIT
If you detect any strange noise, odor, or smoke during use, disconnect the power immediately and contact the customer service center.
- This may result in electrocution or fire.
WARNINGPROHIBIT
Do not use the product in a location where chemical substances, gas stoves, electric heating appliances, and other similar objects are present.
- This may result in fire or equipment failure. Gas leak from a gas stove turned off may especially result in explosion upon activation of the product.
WARNINGPROHIBIT
Only the service engineer is permitted and qualified to disassemble or repair the product.
- Contact the customer service center.
WARNINGPROHIBIT
Do not place a heavy object on top of the power cord or let the power cord get pressed down on the floor.
- This may result in fire, electrocution, or injury.
WARNINGPROHIBIT
Do not place the power cord or the product near a heating appliance.
- This may result in fire or electrocution caused by melting of the power cord sheath. • The product may go through deformation or discoloration.
WARNINGPROHIBIT
This device was not manufactured to be operated by a person who cannot safely operate the device without supervision or instruction due to absence of physical, sensory, or mental capacity, or lack of experience or knowledge (including children).
- Do not let children play with the device.
WARNINGPROHIBIT
Do not excessively bend, tie, or pull on the power cord or the power plug.
- This may result in fire caused by electrocution or short circuit.
WARNINGPROHIBIT
Use the device on a flat surface in a dry location.
- If the floor surface where the product has been placed is not even or at a slope, the product may fall over and result in equipment failure or injury.
WARNINGPROHIBIT
Using an adapter with incorrect specifications may result in motor failure, electrocution, fire, or safety accident.
WARNINGPROHIBIT
If there are any foreign substances or moisture on the power plug, separate the power plug from the power outlet and wipe it off clean with dry cloth.
- This may result in fire, electrocution, or injury.
WARNINGPROHIBIT
Do not let water or foreign substances enter the main body of the product.
- This may result in short circuit, electrocution, or fire.
- If water or foreign substances have entered the main body of the product, turn the switch off on the main body, unplug the power plug from the power outlet, and contact the customer service center.
WARNINGPROHIBIT
Do not use the product in high-temperature (104°F), high-humidity (humidity level above 80%), or dusty locations.
- This may result in short circuit, electrocution, or fire.
WARNINGPROHIBIT
Do not place a dishcloth, towel, etc. on top of the safety net or motor cover while the product is being used.
- This may result in equipment failure or fire.
WARNINGPROHIBIT
Do not forcefully turn the rotating part of the product when touching the product.
- This may result in equipment failure.
- This may result in injury or wound.
WARNINGPROHIBIT
Do not use the product near light objects that are susceptible to floating such as curtains.
- This may interfere with product operation and result in the product falling over or equipment failure.
WARNINGPROHIBIT
Do not use the product if it has broken down.
- Turn off the power switch on the main body, unplug the power plug, and contact the customer service center.
WARNINGPROHIBIT
Do not use the product in a location exposed to direct sunlight or expose the product exterior to smudges from chemical, oil, pesticide, etc.
- This may result in deformity or discoloration of the product.
WARNINGPROHIBIT
When you are leaving the premises or not using the product for a prolonged period of time, unplug the power adapter from the power outlet.
WARNINGPROHIBIT
Do not forcibly change the direction of the fan while the product is operating. Doing will damage the motor.
How to Assemble / Disassemble
CAUTION
- Do not attempt to assemble the product with the power cord plugged in as this may result in electrical shock or product damage.
- Do not apply excessive force or allow the product fall over during assembly.
1Assembling the Base
Place the base on an even, stable surface. Press the button found on the pipe in before inserting the extension support mount.
2Assembling the Fan
Assemble the upper part while pressing the interlocking button on the support mount. Use both hands to assemble to make sure that the product does not fall over during assembly.
Connect the upper part to the base if the middle support mount is not used.
Attach the remote control to the magnet found on the motor cover.
3Connecting the Power Cord
Connect the power cord to the power cord connector found on the base of the unit.
※ This product requires an adapter during use.
How to Use
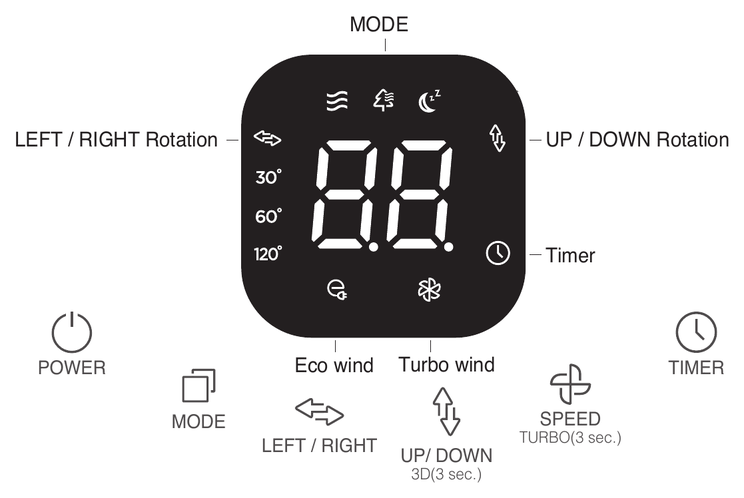
ON / OFF
Press this button to power the unit on or off.
WIND MODE SELECT
Press this button to select the desired mode: (Basic ▶ Natural ▶ Sleep ▶ Eco)
- Basic : Provides a consistent level of wind.
- Natural : It adjusts the wind repetitively from the set wind level to the weaker level.
- Sleep : The wind speed is decreased by 1 level from the set wind level to the weaker wind level every 8 minutes and the wind level is maintained after reaching level 1.
Ex) When setting up Level 3 (Operation Time (per level): 8 min.)
Level 3(8 min.) → Level 2(8 min.) → Level 1(continuous operation)
Eco : The blade speed will automatically adjust depending on the current surrounding temperature to reduce energy consumption
| Speed | Stop | Level | |||||||||||
|---|---|---|---|---|---|---|---|---|---|---|---|---|---|
| 1 | 2 | 3 | 4 | 5 | 6 | 7 | 8 | 9 | 10 | 11 | 12 | ||
| Indoor temp | below 66.2°F | 66.2°F ~ 68°F | 68°F ~ 69.8°F | 71.6°F ~ 73.4°F | 73.4°F ~ 75.2°F | 75.2°F ~ 77°F | 77°F ~ 78.8°F | 78.8°F ~ 80.6°F | 80.6°F ~ 82.4°F | 82.4°F ~ 84.2°F | 84.2°F ~ 86°F | 86°F ~ 89.6°F | above 89.6°F |
※ "00" is displayed and the product stops operating below 66.2°F, and the level is displayed for each set temperature when the temperature is increasing. (Wind level may vary depending on the deviation in temperature detection based on the surrounding environment.)
Left/Right Rotation
Press this button to cycle through the available horizontal positions (30°, 60°, and 120°)
Up/Down Rotation
Press this button to adjust the vertical positioning of the fan. Upward: 85° / Downward: -15°
3D Wind
Press this button for 3 seconds to have the fan repeatedly rotate 360 degrees.
Wind Level Setting
Press this button to cycle through the available wind levels (1-12)
Turbo
Press this button for 3 seconds to initiate a powerful turbo mode. To switch back to basic mode, press the button once more while in turbo mode.
Timer
Press this button to set the operation time from 30 minutes to 12 hours. Each press will increase by 30-minute intervals (10-12 hours will increase by 1-hour intervals).
On timer: You can press the timer button while the product is not operating to set the time for activation and wind level.
Off timer: You can press the timer button while the product is operating to set the time for deactivation.
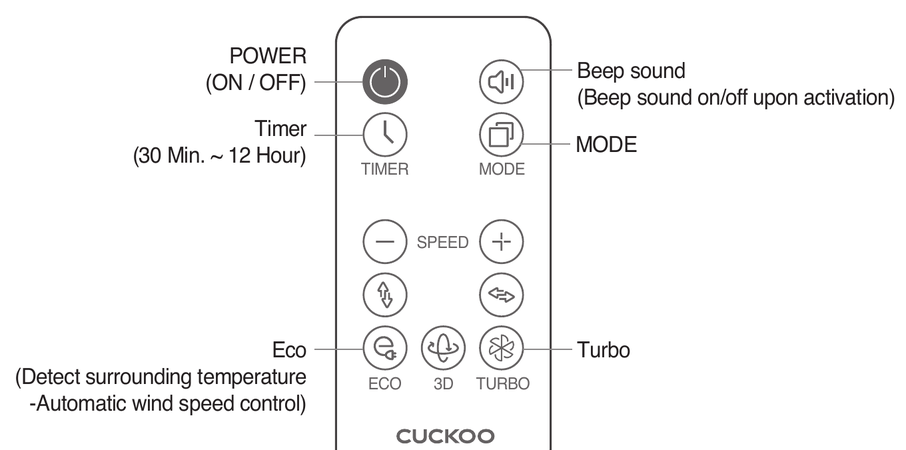
Remote Control
Note
- 1) The configuration panel getting warm during operation and after operation is due to standby power consumption and not an equipment failure so it is safe to use.
- 2) Remove the battery protective film before use (there is a protective film in the packaging).
※ Point the transmitter of the remote control towards the receiver on the main body. (Transmission distance: Approximately 5m from the receiver on the main body)
※ Do not press the buttons on the remote control in succession. This may result in malfunction.
※ Do not drop the remote control or apply excessive force.
※ Use batteries with matching specifications and store the remote control with the batteries removed when it's not being used for a prolonged period of time.
※ Attach the remote control on top of the motor for storage. (There is a built-in magnet which can attach itself to the product.)
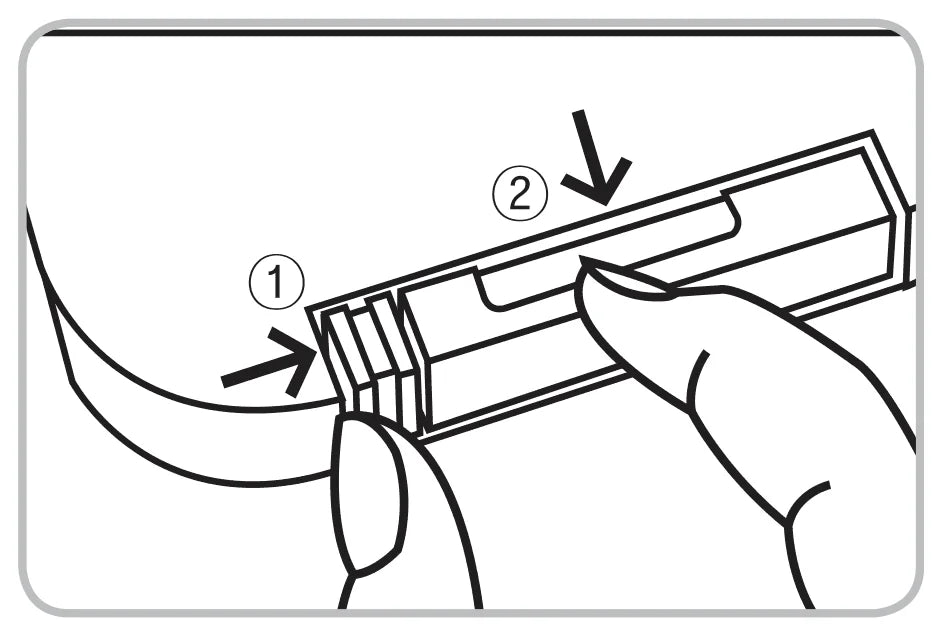
How to Replace Batteries of the Remote Control
-
Push ① shown in the figure to the right in the direction of the arrow (right) and then pull ② in the direction of the arrow to remove the batteries.
-
Install the batteries with the "+" area shown on top and then push to close the lid.
-
Battery specifications: Use CR2025(3V) batteries.
How to disassemble
CAUTION
- Do not apply excessive force on the parts during disassembly. This may result in product damage or injury.
-
Disassemble the screws fastening the safety net
- Use a screwdriver to disassemble the screws at the bottom of the front safety net.
- Be careful not to displace the screws after disassembly.
- Loosening ← (screw icon) → Fastening
-
Disassembling the Front Net
- Slightly turn the front net clockwise to disassemble it from the rear net.
- LOCK ← (arrow left) ▲ (arrow right) → OPEN
- During assembly: Align the arrow shown in the figure above to face upwards and assemble.
-
Disassembling the Blade Holder
- Slightly turn the blade holder clockwise to disassemble it from the rear net.
- Loosening (circular dial diagram labeled FASTEN and LOOSEN)
4Disassembling the Blades
Pull the blades forward from the motor axis to disassemble.
Wear gloves to disassemble since blades may cause injury.
When assembling the blades:
- When assembling the blades, align the protruding motor axis holder and the blade (interior) holder to assemble. Incorrect fastening may result in device damage/destruction, or other performance issues.
5Detaching the Net Holder/Rear Net
Turn the net holder counterclockwise and then detach the rear safety net.
How to Clean & Store
How to Clean
WARNING
- 1) Do not allow water or moisture to get in the interior of the main body as this may cause product damage or electrical shock.
- 2) Always ensure to power off the unit and unplug the power cord before cleaning.
1Stand / Motor Cover
- Using a soft, dry cloth, wipe all debris and dust off the stand/motor cover.
- Do not use chemicals such as thinners, benzene, and alcohol as they will corrode the product's surface.
- Do not allow the motor or the main body to come in contact with moisture or water.
2Blades / Blade Covers
- Using a soft, dry cloth, wipe all debris and dust off the blades/blade covers.
How to Store
If the product will be stored for a prolonged period of time, wipe off all residue, dust, and moisture with a soft cloth before storing.
Troubleshooting
If you are running into issues while operating the appliance, refer to the below troubleshooting chart. If the problem persists, email info@cuckooamerica.com.
| Problem | Possible Causes | Corrective Action |
|---|---|---|
| The blades are not turning. | · Is the power plug plugged into the power outlet? | · Check the connection status of the power plug, power outlet, and main body. |
| · Is the power plug connected to the main body? | · Contact the customer service center. | |
| · Are the blades being obstructed? | · Turn off the power and try again. | |
| · Is it past the time set on the timer? | ||
| The fan is not rotating. | · Is there a rotation icon on the display window? | · Please read the manual before use. |
| · Is there an issue with the motor? | · Please contact customer service. | |
| There is a 'clicking' sound coming from the blades. | · Are the blades and safety net assembled correctly? | · Please assemble the product again in the correct method. |
| · Is the safety net by any chance deformed and is in contact with the blade(s)? | · Please fasten again the blade fixture bolts. | |
| · Are the blade fixture bolts securely fastened? | ||
| The remote control is not working. | · Have you installed batteries correctly inside the remote control according to their respective poles? | · Please check if the batteries have been installed correctly according to their respective poles. |
| · Is there an obstruction around the receiver on the main body? | · Make sure that you have secured a line of sight with the receiver on the main body. | |
| · Is the remote control too far away from the receiver on the main body by any chance? | · Use the remote control within 5 m from the receiver on the main body. | |
| · Are the batteries depleted? | · Install new batteries and try again. |
If the display window is blinking or the product is malfunctioning in a way not specified in the examples above, contact the customer service center immediately.
Specifications
| Appliance Name | Air Circulator |
|---|---|
| Model Number | CF-AC1410WH |
| Rated Voltage | 120V / 60Hz |
| Adapter | * Input : 100-240V~, 0.8A Max, 50/60Hz * Output : 12Vdc , 3A |
| Power Consumption | 35W |
| Dimensions | 15.4 (W) x 14.8 (D) x 39.4 (H) inches |
| Weight | 9.5 lbs. (including adapter) |
For Repair Inquiry
Prolonged use of the appliance may lead to malfunction due to aging of components caused by heat, moisture, dust, etc.
If you experience such problems:
1Check the troubleshoot section to find a solution to your issue. If problem is not resolved contact the service center.
2You can feel the flow of electricity when touching the appliance.
3The power is turned on but the appliance does not work.
4If other abnormalities or breakdown occurs
Stop Using the Appliance
Please unplug the power and contact the service center.
CUCKOO ELECTRIC AIR CIRCULATOR LIMITED WARRANTY
KEY Company, P&K USA TRADING CORP and CUCKOO TRADING CANADA will repair at it's option replace, without charge, your product which proves to be defective in material or workmanship under normal use, during the warranty period listed below from the date of original purchase. This warranty is good only to the original purchaser of the product during the warranty period. KEY Company covers the west and central districts, P&K USA TRADING CORP covers the east and central districts, and CUCKOO TRADING CANADA covers the whole Canada.
WARRANTY PERIOD
MODEL#
CF-AC1410WH
#LABOR
1 YEAR
PARTS
1 YEAR
HOW SERVICE IS HANDLED
- East and Central DistrictsCall : 718 888 9144 / Address : 5-48 46th Rd. Long Island City, NY 11101
- West and Central DistrictsCall: 323 780 8808 / Address: 1137 E 1st Street Los Angeles, CA 90033, USA
- Canada (Toronto)Call : 647.625.1004 / Address : #8-2150 Steeles Ave W, Concord, O.N. L4K 2Y7
- Canada (Vancouver)Call : 604 540 1004 / Address : 945 Lougheed Hwy Coquitlam BC Canada V3K 3T4
No other express warranty is applicable to this product. THE DURATION OF ANY IMPLIED WARRANTIES, INCLUDING THE IMPLIED WARRANTY OF MERCHANTABILITY, IS LIMITED TO THE DURATION OF THE EXPRESS WARRANTY HEREIN. CUCKOO ELECTRONICS CO.,LTD, SHALL NOT BE LIABLE FOR THE LOSS THE USE OF THE PRODUCT, INCONVENIENCE, LOSS OR ANY OTHER DAMAGES, DIRECT OR CONSE QUENTIAL, ARISING OUT OF THE USE OF, OR INABILITY TO USE, THIS PRODUCT OR FOR ANY BREACH OF ANY EXPRESS OR IMPLIED WARRANTY, INCLUDING THE IMPLIED WARRANTY OF MERCHANTABILITY APPLICABLE TO THIS PRODUCT.
Some states do not allow the exclusion or limitation of incidental or consequential damages or limitations on how long an implied warranty lasts : so these limitations or exclusions may apply to you. This warranty gives you specific legal rights and you may also have other rights which vary from state to state.
THE ABOVE WARRANTY DOES NOT APPLY IN THESE CASES:
- To damages caused by delivery due to improper packaging.
- To damages from improper use of the product from the customer due to abuse, accidents, and modifications to the original product.
- To issues that do not involve a defective workmanship, materials, and explanation of how to operate the product.
Therefore, these costs are paid by the consumer. Customer assistance numbers :
To Receive Warranty Coverage : ▶ Keep a copy of purchase receipt as proof of purchase and warranty coverage. ▶ Copy of your sales receipt must be given to receive warranty service.
For product information, sales, customer service, replacement parts, servicing or location of authorized service centers, please contact:
| Region | Contact |
|---|---|
| Parts Distributor or Sales Dealer : East and Central Districts | Call: 718-888-9144/9143 Address: 5-48 46th RD. Long Island City, NY 11101 |
| West and Central Districts | Call: 323-780-8808 Address: 1137 E. 1st St. Los Angeles, CA 90033 |
| Canada (Toronto) | Call : 647.625.1004 Address : #8-2150 Steeles Ave W, Concord, O.N. L4K 2Y7 |
| Canada (Vancouver) | Call : 604 540 1004 Address : 945 Lougheed Hwy Coquitlam BC Canada V3K 3T4 |